Most request tools show every user the same trending feed. Diskovarr learns each person's actual watch history — recommending what's already in your library and what's missing, with a full request pipeline to fill the gaps.
Every user signs in with Plex and gets their own carousels, scored from their real watch history — shared cast and crew, genres, keywords, TMDB similarity. Refreshed every 30 minutes, different for every person on your server.
02 · Requests
Discover what your library is missing
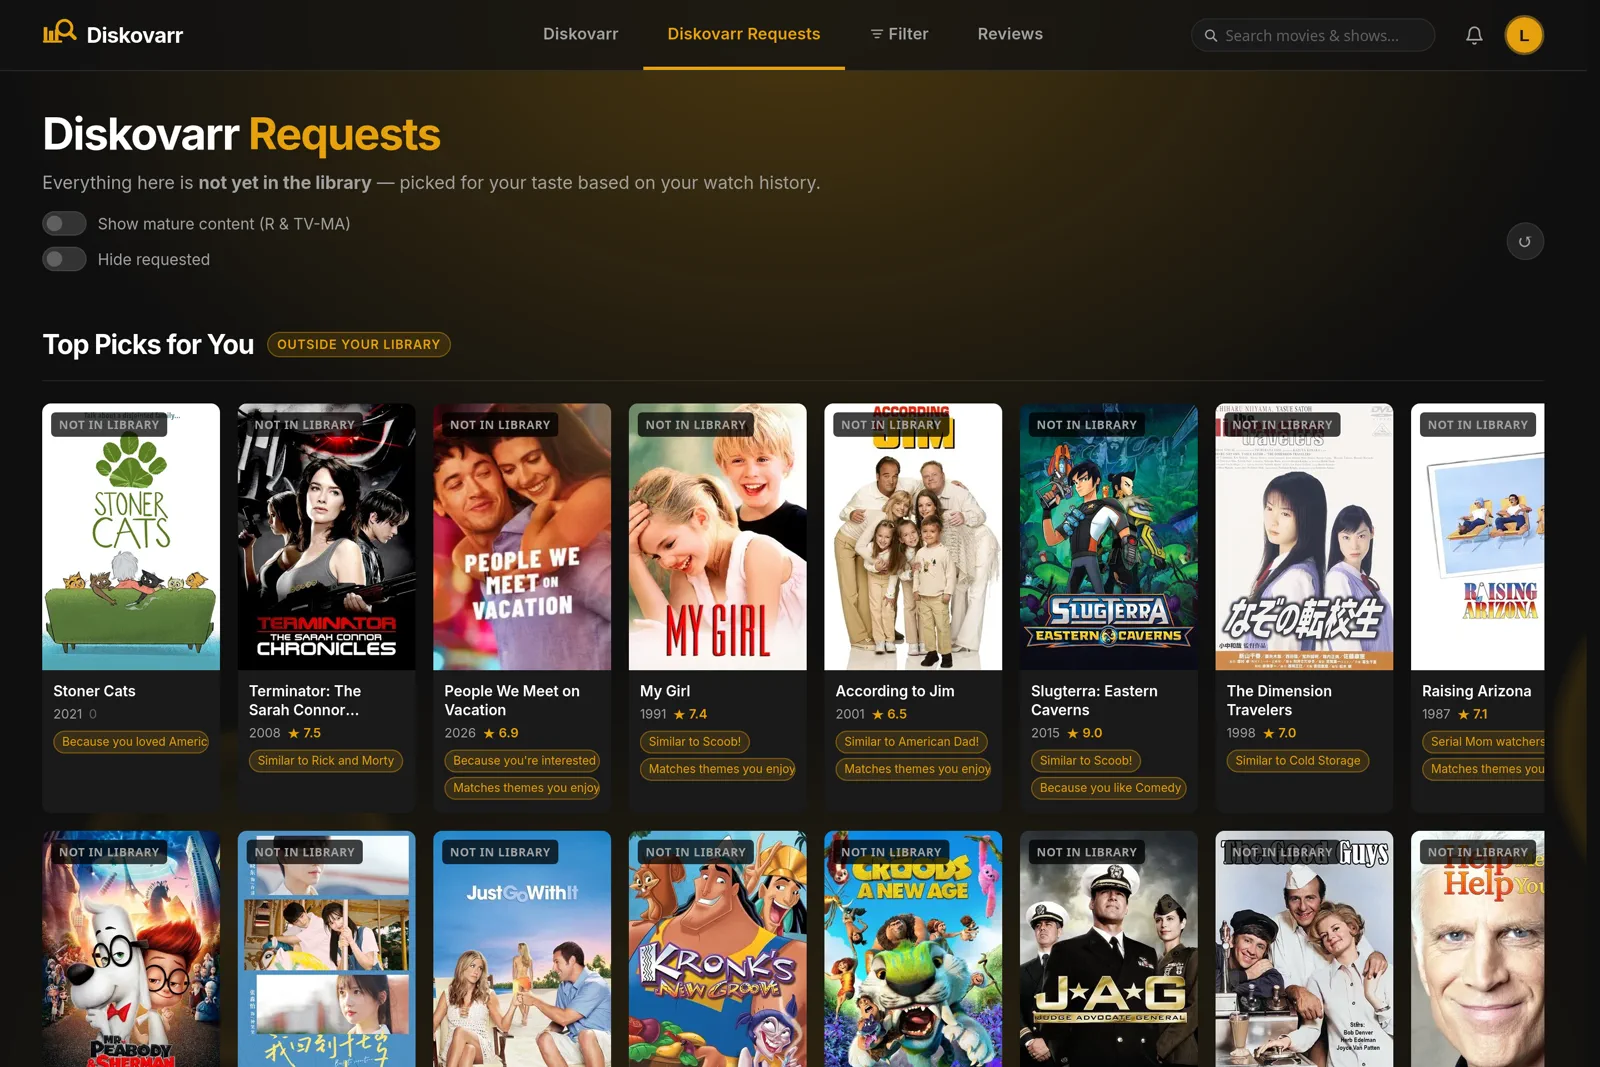
The Requests tab shows only titles not yet in your library — still matched to each user's taste, with genre browsing, coming-soon rows, and a one-click request on every card.
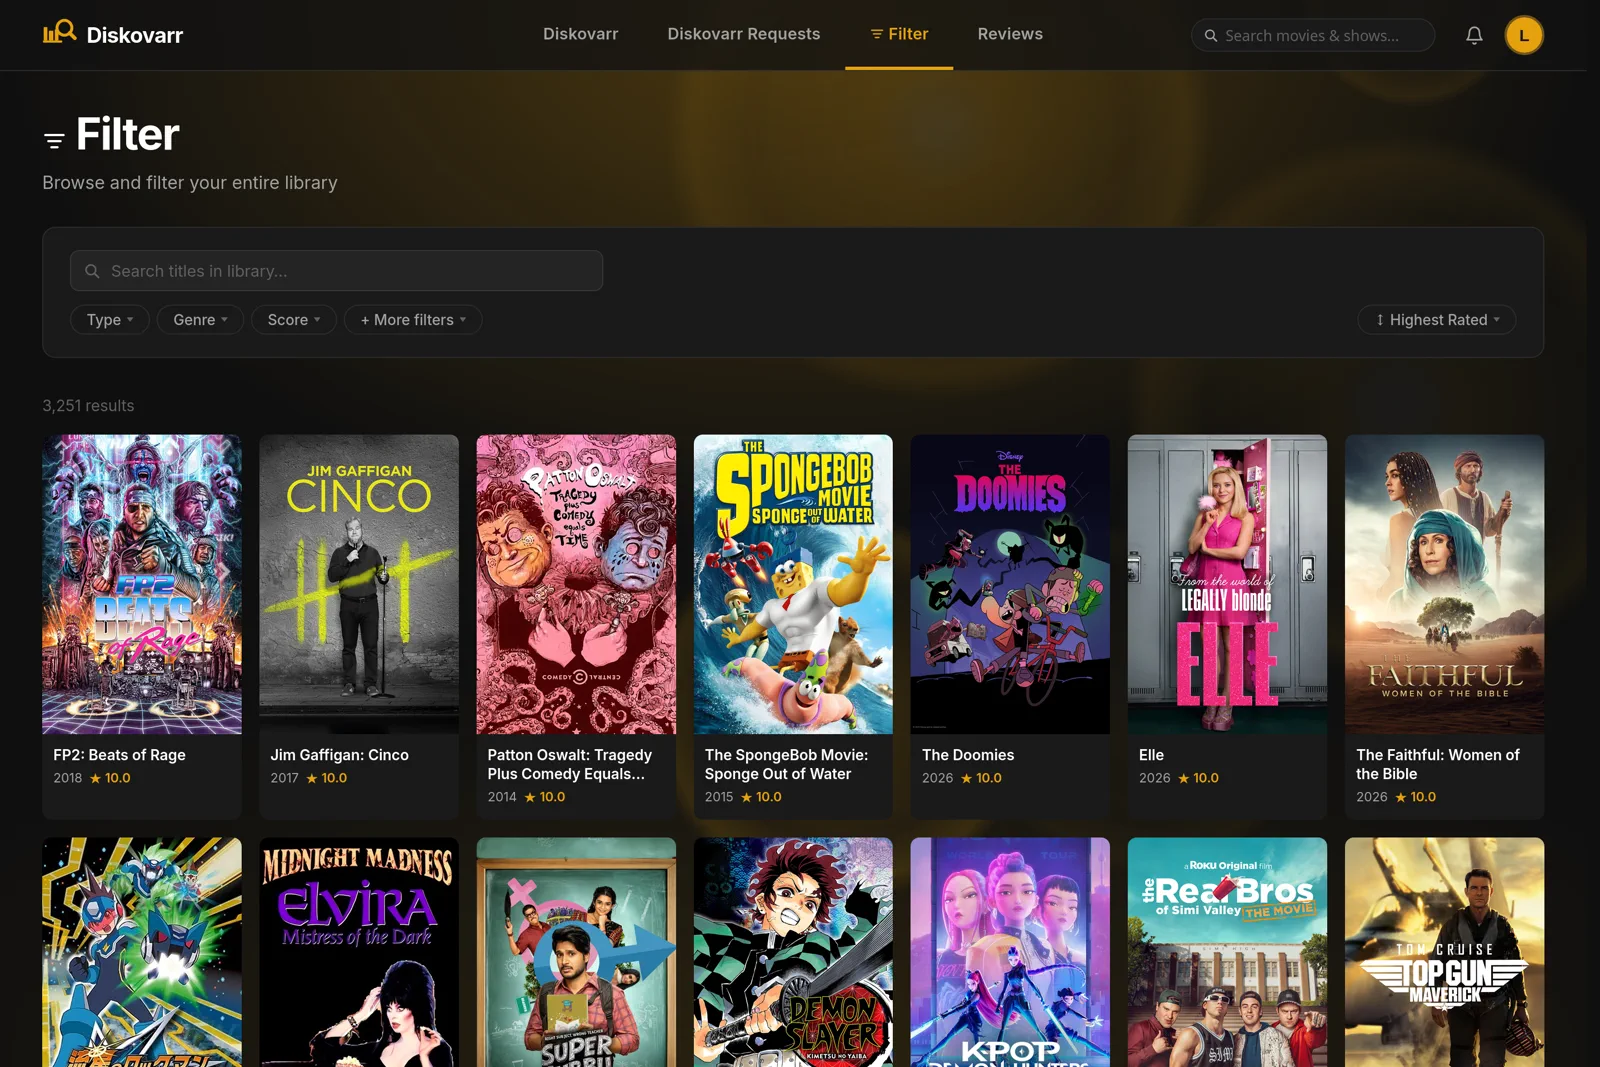
03 · Filter
Browse the whole library, Plex-style
Full filter and sort parity across everything you host — type, genre, score, and deeper stacked filters — so finding tonight's watch never means opening Plex first.
04 · Queue
Approve, edit, route — one queue
Requests land in a single admin queue with season-level TV control, denial notes, per-user limits and auto-approve. Approved items route to Overseerr, Radarr, Sonarr, or DUMB/Riven.
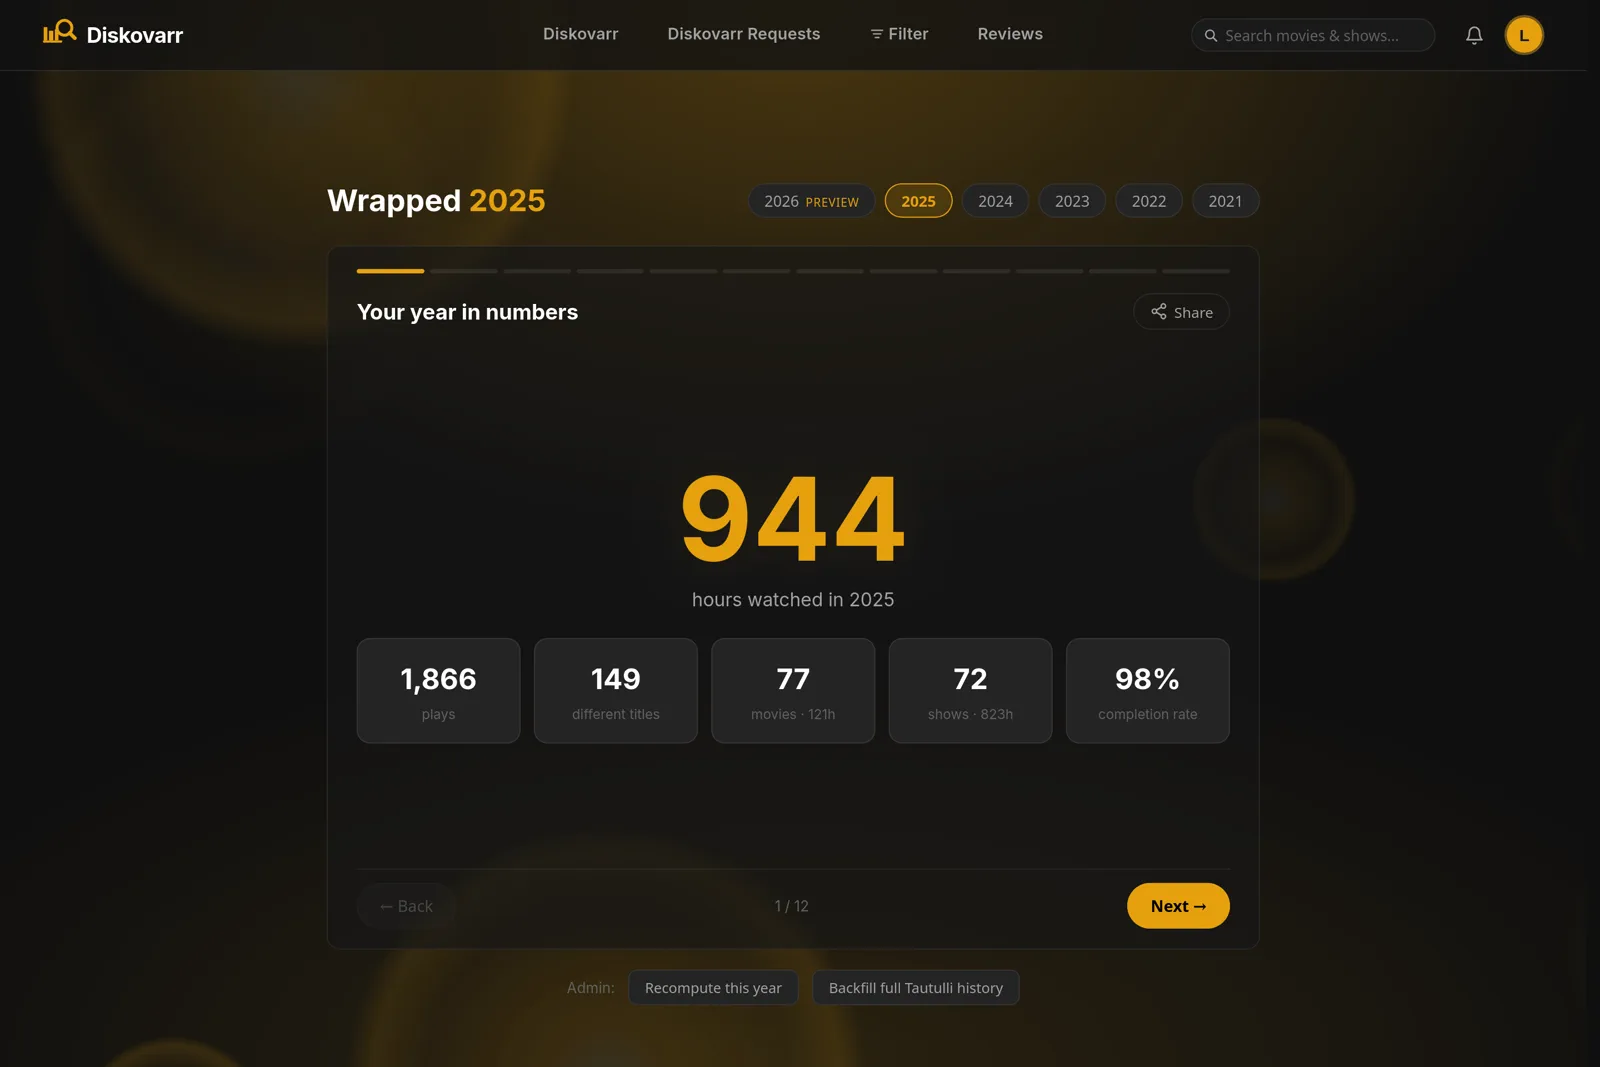
05 · Wrapped
Every December, a year in review
Diskovarr Wrapped gives each user their hours watched, top titles, streaks, and a server leaderboard — with shareable stat cards, Spotify-style.
06 · Admin
Every knob, one panel
Connections, users, automation, and notifications in a single admin panel — pick an accent color and the whole app rethemes instantly.
diskovarr.local
Features
Built like the tools it replaces. Smarter.
Recommendations that are actually personal
Per-user scoring from real watch history: shared cast and crew, genres, keywords, decades, TMDB similarity. Every user's home page is different — and refreshes every 30 minutes.
Discovery beyond your library
The Requests tab is TMDB-powered discovery that only shows what you don't host yet — personalized picks, genre browsing, coming-soon rows, trending, and one-click requests.
Routes anywhere you download
Approve once and Diskovarr hands off to Overseerr, Radarr, Sonarr, or DUMB/Riven — with per-user and global auto-approve, plus an Agregarr shim.
Request queue
Approve, deny, or edit with season-level TV selection and denial notes.
10 notification agents
Discord, Pushover, Telegram, ntfy, Slack, email, WebPush and more — per-type toggles and broadcasts.
Automation
Auto-request from Trakt, IMDb, Letterboxd, MDBList, AniList lists or custom criteria — plus deletion profiles with dry-run.
Watchlist
Save for later from any card, sync with Plex, optionally auto-request on add.
Issue tracking
Playback reports scoped to movie, season, or episode — with threaded comments.
Cast to TV
Send playback from the detail modal to any Plex player — even for remote users.
Jump to Connections to wire up Overseerr, Radarr, Sonarr, or Riven, or check Notifications to configure Discord, Pushover, Slack, Telegram, and more.
Looking for a specific feature?
Use the search box above or browse the sidebar tree. Every page, button, toggle, and setting is documented.
Prerequisites
What you need before installing Diskovarr.
Required
Docker or Node.js ≥ 23.4.0Required
Docker is the recommended way to run Diskovarr - no manual dependency management, automatic restarts, and one-line updates. Any machine with Docker and Docker Compose installed is sufficient.
Node.js is required if you prefer to run natively on the host. Diskovarr uses the built-in node:sqlite module which requires Node 23+. Check your version with node -v; install or update via nodejs.org or nvm. See Installation for both setup paths.
Plex Media ServerRequired
A running Plex server with at least one movie or TV library. Diskovarr reads your library and authenticates users via Plex OAuth. You'll need your Plex admin token.
TautulliRequired
Tautulli provides watch history - the core data source for personalized recommendations. Without it, Diskovarr can't score items for each user. Tautulli must be able to see your Plex server's play history.
TMDB API KeyRequired for Requests tab
Free at themoviedb.org. Register an account, request a v3 API key. Without it the Diskovarr Requests tab is disabled but the home recommendation page still works.
Network Access
Diskovarr must be able to reach your Plex server and Tautulli over HTTP/HTTPS. If they run on the same machine, http://localhost:PORT works. If they're on separate machines, use local IPs or hostnames.
Optionally, expose Diskovarr externally (via Nginx Proxy Manager or similar) so users can access it from outside your home network. An external URL is also required if you want Discord bot avatar upload to work.
Optional Services
Overseerr / JellyseerrOptional
One of the request routing backends. Handles the actual download request after a user submits in Diskovarr.
Radarr / SonarrOptional
Direct request routing without Overseerr. Radarr for movies, Sonarr for TV shows.
DUMB / RivenOptional
Real-Debrid based media acquisition. Diskovarr provides request routing and an Overseerr-compatible bridge for DUMB/Riven request polling.
AgregarrOptional
Collection manager for Plex. Diskovarr provides an Overseerr-compatible API shim so Agregarr can send requests to Diskovarr directly.
Installation
Docker is the recommended installation method - it handles all dependencies, isolates Diskovarr from your host, and makes updates a one-liner. Native installation is also supported if you prefer to run directly on the host.
★
Docker keeps Diskovarr fully contained, restarts it automatically on failure or reboot, and makes updates a one-liner. If you already run other containers (Plex, Radarr, etc.) this is the fastest path to getting running.
Quick start - pull from Docker Hub
The image is published on Docker Hub as lebbi/diskovarr. The fastest way to get running is a single docker run:
That's it. Visit http://your-server-ip:3232 and continue to First-Time Setup. Optional settings (Tautulli, TMDB, etc.) can be entered through the admin panel after first boot.
ℹ
The ./data volume persists the SQLite database and any uploaded files (bot avatars, etc.) across container restarts and updates. Always mount this - without it all data is lost when the container is recreated.
docker-compose.yml (recommended for long-term use)
For a more maintainable setup, use Compose. Create a directory, drop in this file, and you're done:
Docker pulls the image from Docker Hub and starts the container in the background.
2
Check it's running
docker compose logs -f diskovarr
You should see Diskovarr running on port 3232. Press Ctrl+C to stop following logs.
3
Open the app
Visit http://your-server-ip:3232 and continue to First-Time Setup.
Updating
docker compose pull && docker compose up -d
Pulls the latest image from Docker Hub and recreates the container. Your data in ./data is untouched.
ℹ
If you expose Diskovarr externally via a reverse proxy, set the App Public URL in Admin → General to your full external URL (e.g. https://diskovarr.example.com). This is required for Discord bot avatar uploads.
Docker Network (optional)
If Plex, Radarr, Sonarr, or other services also run in Docker, add Diskovarr to the same network so you can reference them by container name instead of IP:
services:
  diskovarr:
    image: lebbi/diskovarr:latest
    container_name: diskovarr
    restart: unless-stopped
    ports:
      - "3232:3232"
    volumes:
      - ./data:/app/data
    environment:
      - ADMIN_PASSWORD=your_password
      - SESSION_SECRET=your_secret
    networks:
      - media

networks:
  media:
    external: true    # name of your existing Docker network
Then in Admin → Connections you can use http://plex:32400, http://radarr:7878, etc. instead of host IPs.
ℹ
Native installation runs Diskovarr directly on your host. You're responsible for keeping Node.js updated and running the process persistently. Docker is easier for most setups, but native works well if you prefer it.
Prerequisites
Node.js v23.4 or newer is required. Check your version:
node -v
If you need to install or update Node.js, use the official installer or nvm:
# Install nvm
curl -o- https://raw.githubusercontent.com/nvm-sh/nvm/v0.39.7/install.sh | bash
source ~/.bashrc

# Install and use Node.js 23
nvm install 23
nvm use 23
Architecture
Diskovarr has two components that run together: a React frontend (Vite) and an Express backend. In production, the frontend is built into static files served by the Express server. For development, both run separately with hot-reload.
Production Install
1
Clone the repository
git clone https://github.com/Lebbitheplow/diskovarr.git
cd diskovarr
At minimum, set SESSION_SECRET, ADMIN_PASSWORD, Plex_URL, Plex_TOKEN, Plex_SERVER_ID, and Plex_SERVER_NAME. See the environment variables reference below.
4
Build the frontend
npm run build
This compiles the React app into optimized static files in dist/, served by the Express backend.
5
Start the server
cd server && npm start
Diskovarr will be available at http://your-server:3232. Continue to First-Time Setup.
Development Mode
For active development, run the Express backend and Vite dev server separately. You'll need two terminal windows:
1
Start the backend (terminal 1)
cd server && npm run dev
The Express server runs on port 3233 with auto-restart on file changes.
2
Start the frontend (terminal 2)
npm run dev
The Vite dev server runs on port 5173 with hot module replacement. API calls are automatically proxied to the backend.
Environment Variables
All environment variables go in server/.env. See the full reference below.
SESSION_SECRETRequired
A long random string used to sign session cookies. Generate with: openssl rand -hex 32
ADMIN_PASSWORDRequired
Password for the /admin panel. Choose something strong - this is the only thing protecting admin access.
PLEX_URLRequired
URL of your Plex Media Server (e.g. http://192.168.1.x:32400).
PLEX_TOKENRequired
Your Plex admin token.
PLEX_SERVER_IDRequired
Your Plex server's machine identifier. Found in Plex Web → Settings → about this Pluto.
PLEX_SERVER_NAMERequired
Display name for your Plex server.
TAUTULLI_URLOptional
URL of your Tautulli instance. Can also be configured in the admin panel.
TAUTULLI_API_KEYOptional
Your Tautulli API key. Can also be configured in the admin panel.
TMDB_API_KEYOptional
Your TMDB API v3 key. Can also be configured in the admin panel.
PLEX_MOVIES_SECTION_IDOptional
Section ID for your Movies library. Defaults to 1. Can also be set in admin panel.
PLEX_TV_SECTION_IDOptional
Section ID for your TV Shows library. Defaults to 2. Can also be set in admin panel.
APP_URLOptional
Public URL of your Diskovarr instance. Used for Plex OAuth callbacks. Defaults to http://localhost:3232.
RIVEN_SETTINGS_PATHOptional
Path to your Riven settings file (e.g. /opt/riven/settings.json). Used for Riven integration.
PORTOptional
Port for the Express backend. Defaults to 3232.
Running as a systemd Service
To keep Diskovarr running after reboots, create a systemd unit file. Replace your-user with your actual username.
cd /home/your-user/diskovarr
git pull
npm install
cd server && npm install
cd .. && npm run build
sudo systemctl restart diskovarr
ℹ
If you expose Diskovarr externally via a reverse proxy, set the App Public URL in Admin → General to your full external URL (e.g. https://diskovarr.example.com). This is required for Discord bot avatar uploads.
First-Time Setup
After starting Diskovarr for the first time, follow these steps to get the core services connected. Once done, Diskovarr will be fully functional - optional integrations (Overseerr, Radarr, Sonarr, Riven, Agregarr) can be added any time from the Connections tab.
1
Open the Admin Panel
Navigate to http://your-server:3232/admin and log in with the ADMIN_PASSWORD you set during installation. You'll land on the General tab.
2
Connect Plex
Go to Admin → Connections → Plex. Enter your Plex server address and port (default 32400), then click Sign in to Plex to open a Plex OAuth window - sign in with the server owner account and Diskovarr will fill in your token automatically.
ℹ
Sign in with the account that owns the Plex server - not a managed user or friend. If you prefer to paste the token manually, see Connection - Plex for instructions.
Click Test to confirm the connection, then Save.
3
Connect Tautulli
Go to Admin → Connections → Tautulli. Tautulli provides per-user watch history - without it, Diskovarr can't generate personalized recommendations.
Address - IP or hostname of your Tautulli server.
Port - Tautulli's default is 8181.
API Key - found inside Tautulli at Settings → Web Interface → API Key. It's a 32-character hex string. If you don't see an API key there, scroll down and make sure Enable API is checked, then save Tautulli's settings.
Click Test to verify, then Save.
ℹ
Tautulli must be connected to the same Plex server you configured in the previous step. If Tautulli is on the same machine as Diskovarr, use localhost as the address.
4
Add a TMDB API Key (enables Diskovarr Requests)
Go to Admin → Connections → TMDB. The TMDB API is free and enables the Diskovarr Requests discovery tab, item detail metadata, search autocomplete, and trailer embeds. Without it, the Requests tab is hidden - the home recommendation page still works.
After verifying your email, go to Settings → API (under your account avatar in the top right).
Click Request an API Key → choose Developer.
Fill in the form - for personal use, describe it as a personal home server project. Accept the terms.
Your API Key (v3 auth) - a 32-character hex string - is shown on the API settings page. Copy it.
Paste the key into Diskovarr, click Test, then Save. The Diskovarr Requests tab will appear immediately for all users.
5
Sync Your Library
Go to Admin → General and click Sync Library Now. This pulls your full movie and TV library from Plex into Diskovarr's local database. The stat cards (Movies, TV & Anime, Total) will update when it finishes. On large libraries (10,000+ items) this can take a minute or two - subsequent syncs are much faster.
Auto-sync runs every 2 hours in the background once enabled - toggle it on in the same section.
6
Set the Server Owner
Go to Admin → Users and find the Server Owner dropdown at the top. Select your own account. This permanently locks your elevated privileges so they can never accidentally be revoked - even by another admin. The owner badge also appears next to your name throughout the admin panel.
Your account appears in this list once you've signed in at least once via the Plex login page (/login).
7
Invite Users
Users sign in at http://your-server:3232/login using their own Plex account. They must be either:
A Plex Friend - you've shared your Plex libraries with them (Plex → Friends → Invite Friend by email)
A Plex Home member - added to your Plex Home from your account settings
The first time they sign in, their Diskovarr profile is created automatically. You can then adjust their settings, limits, and permissions from Admin → Users.
★
That's the core setup done. To let users request media, connect at least one request service - Overseerr, Radarr, Sonarr, or Riven - from the Connections tab. You can also set up Discord and Pushover notifications so users are alerted when their requests are approved or available.
Admin Panel - Connections
Configure all external services. Each service follows the same pattern: toggle to enable/disable, enter credentials, Test, then Save. Saved values are stored masked (shown as ••••••••).
Use the sidebar links to jump to a specific service:
Real-Debrid based media acquisition and DUMB request integration.
Default Request Service
Visible when two or more request services are enabled. Sets which service handles new requests by default. Users with access to multiple services can switch via the Advanced button in the request dialog.
Alternate Request App Access
Controls who sees the Advanced service selector button in request dialogs:
All Users - any user can choose which service to route their request to
Admin Only - only admins and elevated users see the alternate service option
Connection - Plex
Plex is required. It provides the library, user authentication via Plex OAuth, and poster images. All other features depend on this connection being healthy.
What you need
The IP address or hostname of your Plex server
Your Plex server's port (default 32400)
Your Plex admin token - retrieved automatically via the Sign in button, or manually if preferred
Entering the connection
In Admin → Connections → Plex:
AddressRequired
IP or hostname of your Plex server. If Diskovarr and Plex are on the same machine, use localhost. For Docker on the same host, use the server's LAN IP or the container name if they share a network. Do not include http:// or a port here.
PortOptional
Default is 32400. Leave blank to use the default. Only change this if you've moved Plex to a non-standard port.
TokenRequired
Your Plex admin token. Use the Sign in to Plex button to retrieve it automatically, or paste it manually. Stored encrypted - displayed as ••••••• after saving.
Getting your token - Sign in to Plex (recommended)
Click the Sign in to Plex button on the Connections → Plex page. A Plex OAuth window opens - sign in with the account that owns the server. Diskovarr retrieves the token automatically and fills it in. No digging through URLs required.
ℹ
Sign in with the server owner's account. Tokens from managed users or Plex Home members won't have the required library access. The token is stored server-side only - Diskovarr never exposes it to browsers.
Getting your token - manually
If you prefer to paste the token directly:
Open Plex Web (app.plex.tv) and sign in as the server owner.
Click any movie or show → ⋮ menu → Get Info → View XML.
In the new tab's address bar, copy the value after X-Plex-Token= - that's your 20-character token.
Enter the address, port, and token, then click Test. A green success message confirms Diskovarr can reach your Plex server. Click Save.
Connection - Tautulli
Tautulli is required for personalized recommendations. It tracks what every user has watched on your Plex server - Diskovarr uses that history to score and rank titles for each person.
What is Tautulli?
Tautulli is a free, open-source monitoring and tracking tool for Plex. If you don't have it installed yet, grab it from tautulli.com - it runs as a Docker container or native service and takes about 5 minutes to set up. It must be pointed at the same Plex server you connected in the previous step.
Finding your Tautulli API key
1
Open Tautulli and go to Settings
In the Tautulli web interface, click the Settings gear icon in the top navigation (or go to Settings in the sidebar).
2
Open Web Interface settings
In the Settings sidebar, click Web Interface.
3
Copy the API key
Scroll down to the API section. Make sure Enable API is checked. Your API Key (a 32-character hex string) is shown below it. Click it to select all, then copy.
Entering the connection
In Admin → Connections → Tautulli:
AddressRequired
IP or hostname of your Tautulli server. Use localhost if it's on the same machine as Diskovarr.
PortOptional
Default is 8181. Leave blank unless you've changed it.
API KeyRequired
The 32-character key from Tautulli's Web Interface settings.
Click Test then Save. Once saved, Diskovarr will start pulling watch history for recommendations.
Connection - TMDB
The Movie Database (TMDB) provides metadata, poster art, trailers, cast info, and discovery data. The API is completely free for personal use - no credit card required.
Search autocomplete - title suggestions in the nav bar search
Season data - TV season counts and episode info in request dialogs
Without a TMDB key the Requests tab is hidden for all users. The home recommendation page still works since it reads from your existing Plex library.
Getting a free TMDB API key
1
Create a TMDB account
Go to themoviedb.org/signup and register. Verify your email - you can't request an API key without a verified account.
2
Request an API key
Click your avatar in the top right → Settings → API in the left sidebar. Under Request an API Key, click the link and choose Developer.
3
Fill in the application form
TMDB asks for basic details about how you'll use the API. For a personal home server, something like "Personal Plex recommendation and request app for home use" is fine. Accept the terms and submit.
4
Copy your API key
After submitting, you'll be taken back to the API settings page where your API Key (v3 auth) is shown - a 32-character hex string. Copy it.
Entering the connection
In Admin → Connections → TMDB, paste your key into the API Key (v3) field and click Test then Save. The Diskovarr Requests tab appears immediately for all users.
API Key (v3)Required
The 32-character key from your TMDB account API settings. Use the v3 key, not the "API Read Access Token (v4)".
Diskovarr Requests Tab
Toggle to show or hide the Requests tab for all users. Useful if you want to temporarily disable discovery without removing your API key.
Connection - Overseerr
Overseerr (or Jellyseerr) handles the actual download trigger when a user submits a request in Diskovarr. It connects to your Radarr and Sonarr instances and manages approvals, quality profiles, and notifications on its own side. Use this if you already have Overseerr running - or use Radarr/Sonarr directly instead.
Getting your Overseerr API key
1
Open Overseerr and go to Settings
In your Overseerr web interface, click the Settings link in the sidebar (gear icon). You need to be signed in as an admin.
2
Copy the API key from General settings
Under Settings → General, your API Key is shown near the top of the page. Click Copy or select and copy the key manually.
Entering the connection
In Admin → Connections → Overseerr:
AddressRequired
IP or hostname of your Overseerr instance. No port, no http://.
PortOptional
Default is 5055. Leave blank if unchanged.
API KeyRequired
The key from Overseerr → Settings → General.
Enable
Toggle on to make Overseerr available as a request destination. When multiple services are enabled, you can set which is the default in the Connections overview.
Click Test then Save. Users will now see a request button on all items not in the library.
Connection - Radarr
Direct movie request routing without needing Overseerr. When a user's movie request is approved in Diskovarr, it's sent straight to Radarr which handles searching, downloading, and adding it to your library.
Getting your Radarr API key
1
Open Radarr → Settings → General
In your Radarr web interface, click Settings in the sidebar, then choose General.
2
Copy the API Key
Under the Security section, your API Key is listed. Click the clipboard icon or select and copy it.
Entering the connection
In Admin → Connections → Radarr:
AddressRequired
IP or hostname of your Radarr instance.
PortOptional
Default is 7878.
API KeyRequired
The key from Radarr → Settings → General → Security.
Quality ProfileRequired to enable
Click Test first - this loads your available quality profiles from Radarr. Select the profile you want applied to all movie requests routed through Diskovarr (e.g. "HD-1080p", "Any"). If Radarr is temporarily unreachable later, the last-saved profile name is still shown.
Click Test to load quality profiles, select one, then click Save. Movies requested through Diskovarr will now be added directly to Radarr.
ℹ
You can use Radarr and Overseerr at the same time. When both are enabled, set your preferred default in Admin → Connections → Default Request Service. Users with access can switch services per-request using the Advanced button.
Connection - Sonarr
Direct TV show request routing. Works the same as Radarr but for TV series - when a TV request is approved, Diskovarr sends it to Sonarr which handles downloading and library management.
Getting your Sonarr API key
In Sonarr, go to Settings → General → Security. Your API Key is shown there - copy it.
Entering the connection
In Admin → Connections → Sonarr:
AddressRequired
IP or hostname of your Sonarr instance.
PortOptional
Default is 8989.
API KeyRequired
The key from Sonarr → Settings → General → Security.
Quality ProfileRequired to enable
Click Test first to load available profiles from Sonarr, then select one. All TV requests routed to Sonarr will use this profile. Common choices: "HD-1080p", "Any", or a custom profile you've defined in Sonarr.
Click Test to load profiles, select one, then click Save.
ℹ
If you have both Radarr and Sonarr connected, Diskovarr automatically routes movie requests to Radarr and TV requests to Sonarr. No manual routing selection needed - it's based on media type.
Connection - DUMB / Riven
DUMB (Debrid Unlimited Media Bridge) is an all-in-one Docker stack that bundles 25+ media automation services - including Riven, Zurg, rclone, Radarr, Sonarr, Tautulli, Plex, and more - into a single, modular deployment. Riven is one component within DUMB responsible for media automation: it finds debrid-cached torrents and symlinks them into your library without downloading anything locally. Diskovarr connects to the Riven component inside DUMB (or a standalone Riven install) to route requests and provides an Overseerr-compatible bridge for automatic request polling.
★
DUMB is the recommended setup. It handles all the plumbing between Riven, debrid services, rclone, and Plex in one container stack. If you're starting fresh, deploy DUMB rather than installing Riven standalone. Visit github.com/I-am-PUID-0/DUMB for installation instructions.
What this connection does
Request routing - approved requests from Diskovarr are sent to Riven (inside DUMB) which finds a cached torrent on your debrid service and adds it to your library automatically
Overseerr-compatible bridge - Diskovarr exposes an Overseerr-compatible API endpoint so Riven's poller can pull approved requests on its own schedule
Overseerr-compatible bridge - Diskovarr exposes an Overseerr-compatible API endpoint so Riven's poller can pull approved requests on its own schedule
Prerequisites
DUMB running with the Riven service enabled (recommended), or a standalone Riven instance
An active Real-Debrid (or All-Debrid) subscription - Riven uses debrid for cached torrent access
Riven already configured and connected to your Plex library within DUMB
Step 1 - Connect Diskovarr to Riven
In Admin → Connections → DUMB/Riven:
Riven URL
URL of your Riven instance. If using DUMB on the same host, this is typically http://127.0.0.1:8082. If DUMB is on a different machine, use its LAN IP and Riven's port.
API KeyAuto-read
Automatically read from Riven's settings file. Shown for reference - no manual entry needed.
Real-Debrid KeyAuto-read
Read from Riven's environment. Used for Real-Debrid cache checks and integration.
Click Test then Save. Once saved, request routing to Riven is active.
Step 2 - Set up the DUMB request bridge (recommended)
The DUMB integration lets Riven automatically pull and process approved requests from Diskovarr without any manual intervention. Diskovarr exposes an Overseerr-compatible endpoint - configure Riven to point at it using the Overseerr Compat Key from Admin → General.
1
Copy the Overseerr Compat Key from Diskovarr
In Admin → General → Overseerr Compat API, copy the Compat Key using the copy icon. Make sure the toggle is Enabled.
2
Point Riven at Diskovarr as its Overseerr source
In your Riven (or DUMB) settings, find the Overseerr content source configuration and enter:
Overseerr URL → your Diskovarr URL (e.g. http://192.168.1.x:3232)
Overseerr API Key → the Compat Key copied above
Save the Riven settings. Riven will now treat Diskovarr as its Overseerr source for request polling.
3
Choose a request mode in Diskovarr
Pull (recommended) - Riven polls Diskovarr's /api/v1/request endpoint on its own schedule and picks up approved requests. No extra configuration needed on Diskovarr's end.
Push - Diskovarr immediately sends each approved request to Riven the moment it's approved, without waiting for Riven's next poll cycle. Use this for real-time delivery if you find Pull too slow.
ℹ
If you click Regenerate Key in Admin → General → Overseerr Compat API, the old key stops working immediately for all connected apps (DUMB, Agregarr, Homarr). Update the key in Riven's Overseerr settings right away - otherwise Riven's polls will start returning 401 errors and requests won't be processed.
How the bridge works
In Pull mode, Riven periodically calls Diskovarr's /api/v1/request endpoint (Overseerr-compatible format). Approved requests appear with media.status=3 (PROCESSING). Riven picks these up and triggers downloads via your debrid service. When content becomes available, Riven calls PUT /api/v1/media/:id/available which Diskovarr uses to mark the request as fulfilled and send a "Request Available" notification to the requester.
Using Riven without DUMB
If you're running Riven standalone (not inside DUMB), the connection works exactly the same way - enter your Riven URL and follow the same bridge steps above. Request routing and Overseerr-compatible polling both function identically. DUMB is recommended because it manages Riven alongside all the supporting services (rclone, Zurg, Tautulli, etc.) in one place, but it's not a hard requirement.
Connection - Agregarr
Agregarr is a Plex collection manager that can automatically request missing items from your collections. Diskovarr provides an Overseerr-compatible API shim so Agregarr can send those requests to Diskovarr as if it were Overseerr - they show up in your request queue with a bot badge and go through the same approval and routing as user requests.
How it works
When Agregarr finds a movie or show that belongs in one of your Plex collections but isn't in your library, it sends a request to Diskovarr's /api/v1/ shim endpoint. Diskovarr processes it as a regular request, auto-approves it if your settings allow, and routes it to whichever download service you have configured (Overseerr, Radarr, Sonarr, or Riven). Each collection type gets its own service user account in Diskovarr (e.g. "TmdbAgregarr", "ImdbAgregarr") that appears in the request queue.
Setting up the connection
1
Enable the Overseerr Compat API in Diskovarr
Go to Admin → General → Overseerr Compat API and make sure the toggle is Enabled. This activates the /api/v1/ shim endpoint.
2
Copy the Overseerr Compat Key
The Overseerr Compat Key is shown in Admin → General → Overseerr Compat API. Click the copy icon to copy it - you'll paste it into Agregarr in the next step.
3
Add Diskovarr as an Overseerr source in Agregarr
In your Agregarr web interface, go to the Overseerr source configuration and set:
Overseerr URL → your Diskovarr URL (e.g. http://192.168.1.x:3232)
Overseerr API Key → the Compat Key you copied above
Save and restart the Agregarr container if required.
4
Trigger a sync in Agregarr
Run a manual sync in Agregarr or wait for its scheduled run. The first time it connects, it creates service user accounts in Diskovarr automatically. You'll see them appear in Admin → Users with names like "TmdbAgregarr" or "ImdbAgregarr".
ℹ
Agregarr needs to create service user accounts the first time it syncs. The Overseerr Compat Key already has the right permissions for this - no extra steps needed.
Settings reference
Overseerr Compat Key
Shared key for all Overseerr-compatible integrations (Agregarr, DUMB, Homarr). Found in Admin → General → Overseerr Compat API. If you regenerate it, update it in Agregarr and restart its container - the old key stops working immediately for all connected apps.
Enable
Master toggle for the shim, located in Admin → General → Overseerr Compat API. When off, all compat key auth returns 401. Your key is preserved so you can re-enable without reconfiguring any apps.
Regenerate Key
Generates a new compat key and immediately invalidates the old one for all connected apps (Agregarr, DUMB, Homarr). Update each app after regenerating.
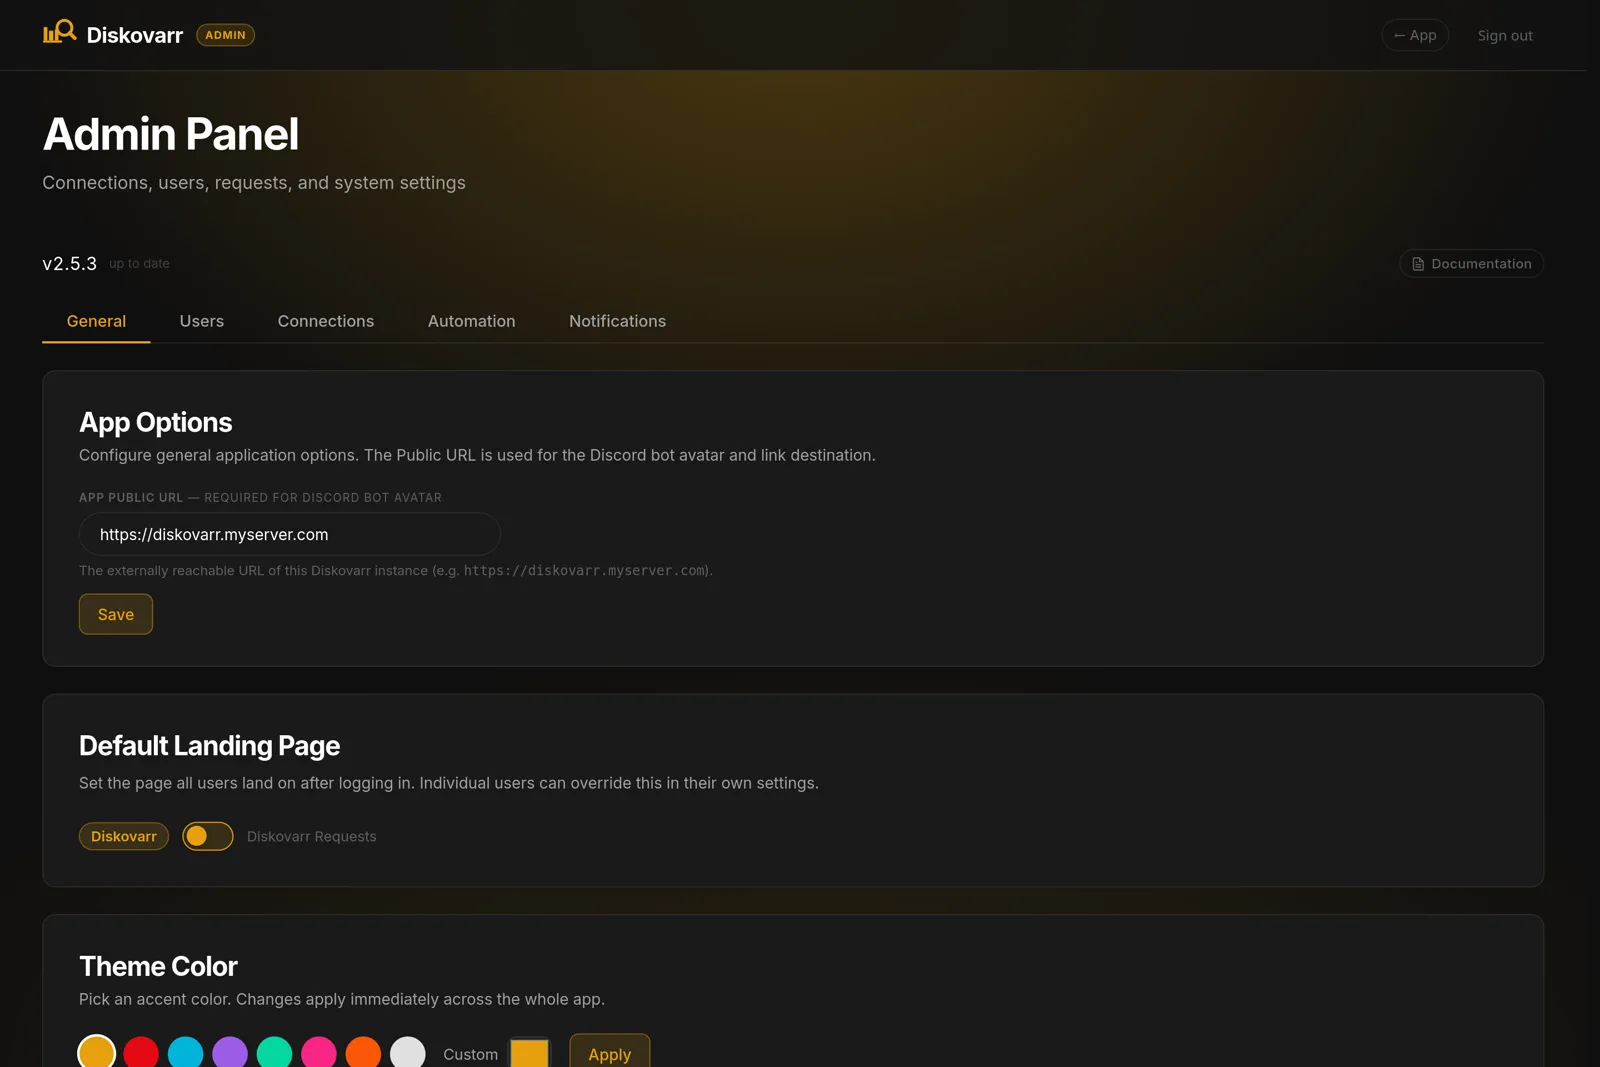
The General tab contains app-wide settings: public URL, theme, library sync, logging, and the API key.
App Public URL
Enter the full external URL where Diskovarr is accessible (e.g. https://diskovarr.example.com). This is used when uploading a Discord bot avatar - without it, the avatar upload will fail. It does not affect Plex authentication.
Theme Color
Pick an accent color for the entire app. Changes apply immediately - all users see the new color on their next page load without a restart.
Preset swatches - click any swatch to apply instantly
Custom color picker - enter any hex value or use the color wheel
Apply button - confirms your selection
Library Sync
Diskovarr maintains an in-memory library cache synced from Plex every 2 hours. The General tab shows the current state and lets you trigger a manual sync.
Auto-Sync Toggle
When enabled, library sync runs automatically every 2 hours. Diskovarr also keeps a permanent WebSocket connection to Plex for instant updates - this runs automatically with no additional setup.
Sync Status Badge
Shows Syncing… (with spinner) or Idle. Stat cards below show Movies count, TV & Anime count, Total, and last sync time.
Sync Library Now
Triggers an immediate full sync from Plex. Disabled while a sync is already in progress. An error banner appears below if the last sync failed.
Synced Libraries
Choose which Plex libraries Diskovarr syncs. Below the sync stats, a summary reads X of Y libraries synced with an Add/Edit Libraries button that opens the selection modal.
Library list
Diskovarr discovers the Movie and TV libraries on your connected Plex server (other library types are ignored). Each row shows a Movie/TV type badge, the library title, its item count, and an enable/disable toggle.
Refresh
Re-queries Plex for the current list of libraries - use it after adding a new library in Plex.
Save Changes
Persists your selection. Enabled libraries are included in sync, recommendations, and search; only enabled libraries contribute content.
⚠
Disabling a library marks it for removal - its synced data is deleted from Diskovarr. Re-enable and sync again to bring it back.
Verbose Logging
When enabled, Diskovarr writes detailed HTTP request logs including headers, query params, and response times. Useful for debugging connection issues.
# View live logs (systemd)
journalctl -u diskovarr -f

# Or if running directly
npm start 2>&1 | tee diskovarr.log
⚠
Verbose logging can produce a large volume of output. Disable it once you're done troubleshooting to avoid filling your disk.
API Key
Generate a token for external API access (scripts, automation tools, etc.). The key is shown once - copy it immediately. You can regenerate at any time, which invalidates the old key.
Eye button - toggle visibility of the masked key field
Copy button - copies key to clipboard
Generate / Regenerate - creates a new key (old key is immediately invalid)
Pass the key in requests using the header: X-Api-Key: your-key-here
Overseerr Compat API
Diskovarr exposes an Overseerr-compatible API at /api/v1/ so external apps that speak the Overseerr API can connect to it directly. Supported apps include DUMB (Riven request polling), Agregarr (collection auto-requests), and Homarr (media stats and request list widgets).
Enable toggle
Master on/off for the shim. When disabled, all requests using the compat key return 401. Your key is preserved so you can re-enable without reconfiguring connected apps.
Compat Key
A single shared key used by all Overseerr-compatible integrations. Copy this into DUMB, Agregarr, and Homarr as the Overseerr API key. Use the eye button to reveal it and the copy button to copy it to the clipboard.
Generate / Regenerate
Creates a new compat key. Once a key exists the button turns red and says "Regenerate Key" - regenerating immediately invalidates the old key for all connected apps (DUMB, Agregarr, Homarr). Update each app with the new key right away.
Service Accounts
Agregarr automatically creates one service user per collection type (e.g. "TmdbAgregarr", "ImdbAgregarr") the first time it syncs. These appear in the Service Accounts list beneath the key. You can set per-user request limits for each bot account from the Users tab.
API Endpoint Reference
A collapsible table of public API endpoints is shown below the API Key section. It documents every endpoint's method, path, parameters, and purpose. See the full API Reference section in this documentation.
Admin Panel - Users
Manage all users on your server: request limits, auto-approve, elevated privileges, bulk actions, and cache controls.
Server Owner
Select which Plex user is the designated server owner. The owner's elevated privileges toggle is permanently locked - they cannot have admin access removed. Choose yourself or a trusted admin account.
Watchlist Mode
Controls how the Watchlist feature works:
Plex Watchlist - reads and writes to the user's actual Plex watchlist. Requires the user to be connected via Plex OAuth.
Diskovarr Playlist - Diskovarr manages its own per-user playlist independent of Plex. Useful if users don't use Plex's native watchlist.
Individual Season Requests
When enabled, TV show request dialogs show a checkbox list of individual seasons so users can request only specific seasons rather than the whole show. When disabled, TV requests are submitted for the full series.
User Table
Lists all known Plex users who have signed in. Columns:
Checkbox - select for bulk operations
User - avatar, username, and Plex user ID
Watched - number of items in their Tautulli watch history
Requests - total number of requests submitted
Last Visit - when they last accessed Diskovarr
Settings ⚙ - opens the per-user settings page (when Diskovarr Requests is enabled)
The table paginates at 10 users per page. Use the per-page dropdown (10 / 25 / 50) to show more. Pagination controls are always visible.
Bulk Edit
Select one or more users via the row checkboxes, then click Bulk Edit Settings to apply settings to all selected users at once. Each field has a three-state selector - No change means that field is skipped for all selected users, so only fields you explicitly set will be updated.
Bulk editable fields: request limit overrides (movies and TV seasons), auto-approve (movies and TV), elevated privileges (grant or revoke).
Cache Management
These buttons affect all users at once. Use when troubleshooting stale data:
Clear All Watched Caches
Forces a fresh Tautulli sync for all users on the next recommendation build.
Clear All Dismissals
Removes all "✕ Dismiss" actions - dismissed items will reappear in recommendations.
Clear Rec Cache (All Users)
Wipes the scored recommendation cache for every user. Recommendations rebuild on next visit (or background pre-warm in ~25 min).
Global Request Limits
Set defaults applied to all users. Individual users can have overrides set on their per-user settings page.
Movies - check Unlimited for no limit, or enter a count and window in days (e.g. "3 movies per 7 days")
TV Seasons - same format, counted per season requested (not per show)
ℹ
The TV season limit counts individual seasons, not shows. If a user requests a 5-season show, that costs 5 against their limit.
Auto-Approve
When enabled, requests skip the queue entirely and route directly to the configured service (Overseerr, Radarr, Sonarr, etc.) without waiting for admin approval.
Auto-Approve Movies - toggle for all movie requests
Auto-Approve TV Shows - toggle for all TV requests
Per-user overrides can enable or disable auto-approve independently of the global setting.
Auto-Request Watchlist
When enabled, adding an item to the Diskovarr watchlist automatically submits a request for it. Works per-media-type:
Auto-Request Movies from Watchlist
Auto-Request TV Shows from Watchlist
Disable All Requests
A global kill switch in the Request Limits section. When toggled on, the Request button is hidden site-wide and any attempt to submit a request is blocked. Individual users can be granted a bypass via their per-user settings page (Override Global → enable requests for that user).
Admin Panel - Automation
The Automation tab automates both ends of library management: Auto Request watches external lists and requests new items for you, and Deletion Profiles clean up content matching criteria you define. Both are off until you configure them - with no lists and no profiles, Diskovarr requests and deletes nothing.
Auto Request
Auto Request monitors lists from around the web and turns new entries into Diskovarr requests automatically - a built-in replacement for Agregarr. Each list syncs on its own schedule, deduplicates against your library and existing requests, and routes new requests through your normal service selection (Radarr, Sonarr, Overseerr, or Riven/DUMB).
Adding a List
Click + Add List and pick one of three source kinds. The Validate & preview button fetches the source and shows resolved titles before you save anything.
Presets - IMDb Top 250 and Most Popular, Trakt trending/popular/anticipated, TMDB charts (popular, top rated, now playing, upcoming), and Top 10 charts per network/streamer (Netflix, Max, Disney+, Apple TV+, Prime Video, Hulu, Paramount+, Peacock).
Pasted URLs - public lists from Trakt (user lists and charts), IMDb (charts and ls… lists), TMDB lists, Letterboxd lists, MDBList, and AniList anime lists.
Criteria - define the list with the same criteria vocabulary as Content Monitors instead of an external source (see below).
Criteria Lists
A criteria list continuously requests content matching rules you define - no external list needed. It uses the same criterion types as Content Monitors: Genre, Cast Member, Director, Writer, Producer, Studio, Network, Production Company, Collection, Keyword, Country, and Language, combined with Match ALL or Match ANY. Where monitors notify you when matching content happens to appear, a criteria list actively goes and finds it.
Examples: Genre: Horror + Cast Member: Toni Collette (ALL) auto-requests her horror films; Network: Netflix keeps up with popular Netflix shows; Collection: The Lord of the Rings grabs every film in the saga; Director: Denis Villeneuve (with a collection enabled) builds a director collection on your Plex home screen.
Values are matched on TMDB at sync time - person, company, keyword, and collection names resolve through TMDB search, so use Validate & preview to confirm a name resolves to the right entity. Results are ordered by TMDB popularity and capped at 100 per sync, with your Max requests per sync still applying on top.
ℹ
Some criteria are media-type specific: Network applies to TV only, Collection to movies only, and TMDB has no Horror genre for TV. In Match ALL mode a criterion that can't apply to a media type simply yields no results for that type.
Media Type
Limit a list to movies only, TV only, or accept both.
New Items
Per-list approval mode. Auto-approve & request submits new items immediately (attributed to an "Auto Request" system user, exempt from per-user rate limits). Queue for admin approval creates them as pending requests in the Request Queue instead.
Sync Every (hours)
How often the list is re-checked. The runner wakes every 15 minutes and syncs whichever lists are due.
Max Requests Per Sync
Caps how many new requests one sync can create, so adding a 250-item list doesn't flood your downloaders. Set 0 for a collection-only list that never requests anything.
Plex Collections from Lists
Any list can also maintain a Plex collection mirroring its in-library items. Items are added as they arrive and removed when they drop off the source list. Choose where the collection is promoted:
Home page + Recommended - pinned to the server home screen (yours and shared users') and the library's Recommended tab
Library Recommended tab - promoted only inside the library
Library only - a plain collection with no promotion
A list set to Movies + TV produces two collections (the TV one named "Name (TV)"), since Plex collections live in a single library section. Deleting a list asks whether to remove its Plex collection too.
Source Credentials
Two sources need free credentials, entered at the bottom of the Auto Request section. Everything else works out of the box.
Trakt Client ID - create an app at trakt.tv/oauth/applications; only the client ID is needed (no OAuth login).
MDBList API Key - free from mdblist.com/preferences.
ℹ
IMDb blocks server-side scraping, so IMDb charts and lists are fetched through the public Servarr mirror that Radarr itself uses - this covers movies only, so IMDb TV charts aren't available. AniList entries are matched to TMDB by title, so spin-off seasons listed separately may show as "unresolved".
Deletion Profiles
Deletion profiles automatically clean up library content matching criteria you define. The safety model is layered:
No profiles = nothing is ever deleted. The deletion job exits immediately.
New profiles start in dry-run mode and report matches without touching anything.
An empty profile (no criteria) matches nothing - it can never mean "delete everything".
Items on any user's watchlist are protected by default, plus optional exclusions by collection, label, or minimum library age.
Every run is capped by Max deletions per run, and every action is recorded in a permanent history.
Modes
Dry runDefault
Evaluates and reports matches in the Activity section. Deletes nothing.
Review
Matches go to a Pending Review queue; nothing is deleted until you approve a batch.
Automatic
Matches are deleted once they've matched continuously for the grace period (days since first match), up to the per-run cap. Admins get a notification summarizing what was removed and how much space was freed.
Criteria
A profile targets movies or TV shows and matches when all of its criteria are true. Available criteria:
Watch data - never played, not played in the last X days (includes never played), total plays across all users
Age - added to library more than X days ago, release year
The Preview matches button in the editor evaluates the profile right now - including unsaved changes - and lists exactly what would be deleted, with the reasons each title matched and the total space involved.
⚠
Watch-based criteria use the locally cached Tautulli history. If no watch history has synced yet, profiles using those criteria refuse to run rather than treating the whole library as "never played".
How Deletion Works
Deletion is tiered so files are removed cleanly and don't come back:
Radarr / Sonarr first - if the item is managed there, it's deleted with its files, optionally adding an import exclusion so the *arr never re-grabs it (the Block re-download toggle).
Plex fallback - otherwise Diskovarr uses Plex's own delete API, which requires Allow media deletion in your Plex server's library settings. If Plex refuses, the item is marked failed with a clear explanation.
Riven / DUMB cleanup - when Riven is configured, the item is also removed from Riven, and any old Diskovarr requests for the title are purged so DUMB's request polling can't immediately re-add it. Titles on monitored Auto Request lists are flagged so they're never re-requested either.
Trash handling - after a deletion run, the affected library sections are refreshed and Plex's trash is emptied automatically, so deleted items don't linger as "unavailable" entries.
Activity
The Activity section is the audit trail for deletion automation:
Pending Review - select items matched by review-mode profiles and delete or dismiss them in batches; each entry shows why it matched, its size, and play stats.
Dry-Run Matches - what dry-run and automatic profiles currently match (automatic profiles delete these once the grace period elapses).
Deletion History - everything deleted, failed, or dismissed, with the method used (Radarr, Sonarr, or Plex) and space freed.
Admin Panel - Notifications
Diskovarr can notify users and admins through multiple channels: the in-app bell, Discord (shared channel webhook and/or personal bot DMs), Pushover push notifications, and eight additional agents - Webhook, Slack, Gotify, ntfy, Telegram, Pushbullet, Email, and WebPush. All can be active simultaneously with independent settings and per-type toggles. Notifications include clickable hyperlinks that open the relevant item in Diskovarr. This page walks through setting up each one from scratch.
Broadcast Message
Type a message in the editor and click Notify All Users. The message is delivered simultaneously to the in-app bell for all users, plus Discord and Pushover if configured. Broadcast bell notifications open a full-text modal when clicked rather than navigating away.
Font Styles
The broadcast editor is a rich-text field with a formatting toolbar. Each button toggles a style on the current selection and highlights while that style is active, so you can see at a glance what is applied; pressing it again removes the style. Keyboard shortcuts work too.
Bold (Ctrl+B)
Italic (Ctrl+I)
Underline (Ctrl+U)
Strikethrough (Ctrl+Shift+S)
Code (Ctrl+E) - monospaced inline code
Highlight (Ctrl+Shift+H) - emphasizes text with the app accent color
On submit, the formatting is converted to Discord-flavored markdown so bold, italic, underline, strikethrough, and code render natively in Discord webhooks and bot DMs, and the styled text is shown in the in-app notification bell and modal.
ℹ
Highlight is a non-standard marker. It renders with the app accent inside Diskovarr's in-app modal; channels that do not recognize it (such as Pushover) simply show the surrounding text unstyled.
Notification Types
All notification services share the same 10 event types. Each service has its own independent set of checkboxes - you can enable "Request approved" on Discord but not Pushover, for example. The recipient column shows who receives each type:
New request pendingAdmins
Fired when a user submits a request that requires manual approval.
Request auto-approvedAdmins
Fired when auto-approve is on and a request is routed immediately without admin review.
Request approvedRequester
Sent to the user who made the request when an admin approves it.
Request declinedRequester
Sent to the requester when their request is declined, optionally including the admin's note. Includes a clickable link back to Diskovarr.
Request available in libraryRequester
Sent when a requested title appears in the Plex library. Diskovarr detects new content in real time via its built-in WebSocket connection to Plex - no Plex Pass required, no webhook setup needed. Clicking the in-app notification opens the item's detail modal. External notifications (Discord, Telegram, etc.) include clickable hyperlinks back to the relevant page in Diskovarr.
Request processing errorAdmins
Fired when a request fails to forward to Overseerr, Radarr, Sonarr, or Riven.
New issue reportedAdmins
Fired when a user reports a playback issue through the detail modal.
Issue status updatedRequester
Sent to the issue reporter when an admin resolves or closes it.
Issue commentBoth
Admin comments on an issue notify the reporter. User comments notify all admins.
Request auto-requested from watchlistAdmins
Fired when auto-request from watchlist is enabled and an item is automatically submitted as a request.
Discord - Webhook Setup
A webhook posts notification embeds to a single Discord channel. It's the simplest way to get shared visibility - everyone in that channel sees new requests, approvals, and alerts. No bot account needed.
Step 1 - Create the webhook in Discord
1
Open your Discord server settings
In Discord, right-click your server name in the left sidebar (or click the server name at the top) and choose Server Settings.
2
Go to Integrations → Webhooks
In the left sidebar under Server Settings, click Integrations, then click Webhooks. Click New Webhook.
3
Configure and copy the URL
Give the webhook a name (e.g. "Diskovarr"), choose which channel it posts to using the Channel dropdown, then click Copy Webhook URL. The URL looks like: https://discord.com/api/webhooks/1234567890/AbCdEfGhIjKlMnOp...
Step 2 - Enter the URL in Diskovarr
Paste the webhook URL into the Webhook URL field in Admin → Notifications → Discord Webhook. Toggle the enable switch on, choose your notification types, then click Save. Click Test to verify a test embed arrives in the channel.
Webhook Settings Reference
Enable
Master toggle for the webhook. Disabling it stops all webhook posts without clearing your settings.
Webhook URLRequired
The full discord.com/api/webhooks/... URL from the step above.
Notification Role IDOptional
If you want webhook messages to @mention a Discord role (e.g. to ping your Plex admins), paste the role's numeric ID here and check the Mention role checkbox. To find a role ID: enable Developer Mode in Discord (User Settings → Advanced → Developer Mode), then right-click the role in Server Settings → Roles and choose Copy Role ID.
Embed Poster
Includes the movie or show's poster image in the Discord embed. Disable if you prefer text-only messages or if images make the channel too noisy.
Notification type checkboxes
Select which events post to this channel. A typical admin setup: enable "New request pending" and "New issue reported" so admins see activity; leave requester-specific types (approved, denied, available) off since they'll be handled by the bot DM or Pushover.
Discord - Bot Setup
A bot sends personal DMs to individual users. Each user receives only notifications relevant to them (their own requests, their own issues) rather than a shared channel flood. Both webhook and bot can be active at the same time with independent notification type selections.
ℹ
For bot DMs to reach a user, two things must be true: the user must be in your Discord server, and their DMs from server members must be allowed. Discord blocks DMs by default on many servers - the easiest fix is having users right-click the server → Privacy Settings → enable Direct Messages.
Step 1 - Create a Discord application and bot
1
Open the Discord Developer Portal
Go to discord.com/developers/applications and log in with your Discord account. Click New Application in the top right.
2
Name your application
Give it a name like "Diskovarr" - this becomes the bot's default display name. Click Create.
3
Add a bot to the application
In the left sidebar, click Bot. Click Add Bot → Yes, do it!. The bot user is now created.
4
Copy the bot token
On the Bot page, click Reset Token → confirm → then click Copy. The token looks like: MTIzNDU2Nzg5MA.GhIjKl.MnOpQrStUvWxYz... Treat this like a password - anyone with it can control your bot. Do not share it or commit it to git.
5
Enable the Message Content intent (optional but recommended)
Still on the Bot page, scroll down to Privileged Gateway Intents and enable Message Content Intent. This isn't strictly required for DMs but prevents warnings and is good practice.
6
Invite the bot to your server
In the left sidebar click OAuth2 → URL Generator. Under Scopes, check bot. Under Bot Permissions, check Send Messages (that's all it needs for DMs). Copy the generated URL and open it in your browser to invite the bot to your Discord server.
Step 2 - Enter the token in Diskovarr
Paste the bot token into Bot Token in Admin → Notifications → Discord Bot. Enable the toggle, configure your notification types, and click Save. Click Test - if your own Discord User ID is set in your My Settings, you should receive a test DM from the bot.
Step 3 - Create a non-expiring invite link (recommended)
Users need to be in your Discord server to receive DMs. Create a permanent invite: right-click your server → Invite People → click Edit invite link → set expiry to Never → copy the link. Paste it into the Discord Server Invite Link field in Diskovarr. This shows a "Join Server" button on each user's My Settings page.
Step 4 - Users configure their Discord User ID
Each user who wants bot DMs must enter their own Discord User ID in My Settings → Discord. To find a user ID:
In Discord, go to User Settings → Advanced → enable Developer Mode
Right-click any user's name → Copy User ID (a numeric string like 123456789012345678)
Paste that into the Discord User ID field in Diskovarr My Settings → Save
Bot Settings Reference
Enable
Master toggle for the bot. Independent of the webhook toggle.
Bot TokenRequired
The secret token from the Developer Portal. Never expose this publicly. If compromised, regenerate it immediately in the Developer Portal (Reset Token) and update Diskovarr.
Bot UsernameOptional
Overrides the display name shown in DMs. If blank, uses the bot's account name set in the Developer Portal.
Bot AvatarOptional
Upload a PNG/JPG/GIF (128×128 px recommended, max 2 MB) or enter a direct image URL. The avatar is pushed to Discord's API via your bot token. Requires App Public URL to be set in Admin → General - without it, the upload API call has no return address and will fail.
Discord Server Invite LinkOptional
A permanent invite URL shown as "Join Server" in each user's My Settings. Use a never-expiring invite so it doesn't break after a few days.
Embed Poster
Attaches the movie/show poster to DM embeds. Independent of the webhook's embed poster setting.
Pushover Setup
Pushover delivers push notifications to iOS and Android phones. The Pushover app costs a one-time $5 per platform (free 30-day trial). Once set up, it's highly reliable and works even when Discord DMs are blocked.
★
Pushover is a great complement to Discord: use Discord for shared channel visibility and Pushover for per-user personal alerts (request approved, item available) that don't belong in a group channel.
Step 1 - Create a Pushover account and install the app
1
Sign up at pushover.net
Go to pushover.net and create a free account. Your User Key (a 30-character string) is displayed on the dashboard immediately after signup. Keep this page open - you'll need it shortly.
2
Install the Pushover app on your phone
Download Pushover from the App Store (iOS) or Google Play (Android). Open it and log in with your pushover.net credentials. The app registers your device - you'll see the device name appear on your pushover.net dashboard under "Your Devices".
3
Create an application API token
On pushover.net, scroll down to Your Applications and click Create an Application/API Token. Fill in:
Name: Diskovarr (or whatever you like)
Type: Application
Description / URL / Icon: Optional, can be left blank
Click Create Application. Your new API Token/Key (also 30 characters) is shown on the next page. This is the application token - different from your user key.
Step 2 - Enter keys in Diskovarr (Admin)
In Admin → Notifications → Pushover:
Application API Token - paste the token from the application you just created
User or Group Key - paste your personal 30-character user key from the pushover.net dashboard. This is the admin's own key - it receives admin-type notifications (new request, new issue, etc.).
Choose a notification sound, configure your notification types, click Save, then click Test. Your phone should buzz within a few seconds.
Step 3 - Users add their own Pushover key
Each user who wants Pushover notifications must enter their own Pushover User Key in My Settings → Pushover. They follow the same signup process (pushover.net account + app install), then copy their user key and paste it in Diskovarr. They do not need to create a separate application - they all share the same application token you created as admin.
ℹ
The Application API Token is set once by the admin and is shared across all users. The User Key is per-person - each user enters their own. Diskovarr routes notifications to the correct user by pairing the shared app token with each user's individual key.
Pushover Settings Reference
Application API TokenRequired
The token from the application you created at pushover.net. Shared across all users - do not confuse with the user key.
User or Group KeyRequired
The admin's own Pushover user key (30 characters). Controls which device(s) admin-type notifications are delivered to. If you want admin notifications to go to multiple people, create a Pushover Group on pushover.net and paste the group key here instead.
Notification Sound
The default sound for Diskovarr notifications on all devices. Options: Device Default (uses whatever the device has set), Silent (no sound), Vibrate Only, Pushover (default tone), and 17 named sounds (Bike, Bugle, Cash Register, Classical, Cosmic, Falling, Gamelan, Incoming, Intermission, Magic, Mechanical, Piano Bar, Siren, Space Alarm, Tug Boat) plus 5 long-duration variants. Users can override this with their device's per-app sound settings in iOS/Android.
Embed Poster
Attaches the movie/show's poster image to notifications. Pushover supports image attachments natively - the poster appears inline in the notification on the lock screen.
Notification type checkboxes
Select which events trigger Pushover notifications. A typical setup: enable requester-facing types (approved, denied, available, issue updated) since those are personal and time-sensitive; leave admin types optional.
Pushover Groups (for multi-admin setups)
If you have multiple admins who all need to receive admin-type notifications (new request, new issue), create a Pushover Group: on pushover.net → Your Groups → Create a Group. Add each admin's user key to the group. Paste the group key into Diskovarr's User or Group Key field. All group members receive the notification simultaneously.
Webhook
Send notifications to any HTTP endpoint as JSON. Supports customizable JSON templates, custom headers, and variable substitution. Works with tools like n8n, Make, Home Assistant, and custom scripts.
Configuration
Webhook URLRequired
The HTTP endpoint that receives POST requests with JSON payloads.
Auth HeaderOptional
Authorization header value (e.g. Bearer your-token).
JSON TemplateOptional
Customizable JSON payload template. If empty, a default template is used. Supports template variables: {{notification_type}}, {{event}}, {{subject}}, {{message}}, {{image}}, {{url}}, {{timestamp}}. Variables are resolved recursively in nested objects and arrays.
Custom HeadersOptional
Additional HTTP headers to include with each request.
Variables in URLOptional
When enabled, template variables in the webhook URL itself are resolved (e.g. routing to different URLs per notification type).
Slack
Send notification messages to a Slack channel using an Incoming Webhook. Uses Slack's Block Kit for formatted messages with emoji icons, description text, and clickable links.
Step 1 - Create a Slack Incoming Webhook
1
Create a Slack app
Go to api.slack.com/apps and click Create New App → From scratch. Name it and select your workspace.
2
Add Incoming Webhooks
In your app's settings, go to Features → Incoming Webhooks. Toggle it On. Scroll down and click Add New Webhook to Workspace. Choose the channel you want to post to and click Allow.
3
Copy the webhook URL
Copy the generated webhook URL. It starts with https://hooks.slack.com/services/T...
Step 2 - Enter in Diskovarr
Paste the webhook URL into Admin → Notifications → Slack. Enable the toggle, select notification types, and click Save. Click Test to verify a message appears in your Slack channel.
Gotify
Send notifications to a self-hosted Gotify server. Gotify delivers push notifications to your phone and desktop with minimal setup.
Configuration
Gotify URLRequired
The base URL of your Gotify server (e.g. https://gotify.example.com).
Application TokenRequired
Create an application in Gotify and use its token. Go to your Gotify web UI, click + Application, give it a name, and copy the generated token.
Messages are sent in Markdown format with a clickable link to the relevant Diskovarr page.
ntfy
Send notifications via ntfy - a simple pub-sub notification service. Use the free public server (ntfy.sh) or self-host your own instance.
Configuration
ntfy URLRequired
Your ntfy server URL. Use https://ntfy.sh for the public server, or your own instance URL.
TopicRequired
The topic name to publish to (e.g. diskovarr). Subscribe to this topic on your phone or desktop to receive notifications.
PriorityOptional
1 (minimal) through 5 (urgent). Default is 3.
AuthenticationOptional
For self-hosted instances with auth: choose Bearer Token or Basic Auth and enter credentials.
Embed PosterOptional
Attach the movie/show poster image to the notification as a file attachment.
Messages include a clickable link that opens directly in Diskovarr.
Telegram
Send personal notifications through the Telegram Bot API. Each user can configure their own Telegram chat ID to receive DMs from the bot. Supports MarkdownV2 formatting, inline buttons, and poster images.
Step 1 - Create a Telegram Bot
1
Message @BotFather
Open Telegram and search for @BotFather. Send /newbot and follow the prompts to name your bot.
2
Copy the bot token
BotFather will give you a token like 123456789:ABCdefGHIjklMNOpqrSTUvwxYZ. Copy it.
3
Get your chat ID
Message your new bot, then visit https://api.telegram.org/bot<YOUR_BOT_TOKEN>/getUpdates in a browser. Find the "chat":{"id":123456789} field - that's your chat ID. Alternatively, message @userinfobot for your numeric ID.
Step 2 - Configure in Diskovarr
Bot API TokenRequired
The token from BotFather.
Chat IDRequired
Your admin chat ID for admin-type notifications.
Message Thread IDOptional
For forum supergroups: the thread ID where messages should be posted.
Send SilentlyOptional
Suppresses sound and vibration on the recipient's device.
Embed PosterOptional
Sends the movie/show poster as a photo attachment with the notification as its caption.
Each notification includes an inline View in Diskovarr button. Users can optionally configure their own Telegram chat ID in My Settings → Telegram to receive personal notifications (approved, denied, available).
Pushbullet
Send push notifications through Pushbullet. Messages are delivered to your linked devices (phone, desktop app, browser extension). Supports note-style messages and link-type messages with clickable URLs.
If you want notifications sent to a Pushbullet channel instead of your personal devices, enter the channel's tag here.
Users can optionally set their own Pushbullet access token in My Settings → Pushbullet to receive personal notifications on their own devices.
Email
Send notification emails via SMTP. Supports custom sender name, HTML-formatted messages with poster images, and TLS/STARTTLS. Users with email addresses on file receive personal notifications.
Configuration
SMTP HostRequired
Your SMTP server address (e.g. smtp.gmail.com, mail.example.com).
Enable for port 465 (implicit TLS). Leave off for port 587 with STARTTLS.
Allow Self-SignedOptional
Skip certificate verification for self-signed TLS certificates.
Require TLSOptional
Force TLS upgrade. Refuses to send if TLS negotiation fails.
Auth Username / PasswordOptional
SMTP credentials if your server requires authentication.
From EmailRequired
The sender email address (e.g. diskovarr@example.com).
Sender NameOptional
Display name shown in the From field. Defaults to "Diskovarr".
Emails are sent as formatted HTML with poster images. Each notification includes a clickable button to open the relevant page in Diskovarr.
WebPush
Send native browser push notifications using the Web Push API. Works even when the browser tab is closed. Users subscribe from their browser - no server-side email or phone setup required.
How It Works
WebPush uses VAPID keys (auto-generated on first use) to authenticate push messages. Users subscribe from My Settings → WebPush by clicking Subscribe and allowing browser notifications. Each subscription is stored and used to deliver push notifications to the user's browser.
Configuration
Enable
Master toggle. When enabled, VAPID keys are auto-generated on first use. No other configuration is required on the admin side.
ℹ
WebPush requires Diskovarr to be served over HTTPS. The Web Push API does not work on HTTP origins. Make sure your reverse proxy is configured with a valid TLS certificate.
Admins receive WebPush notifications for admin-type events. Regular users receive personal notifications for events relevant to them (request approved, available, etc.). Users manage their subscription from My Settings → WebPush.
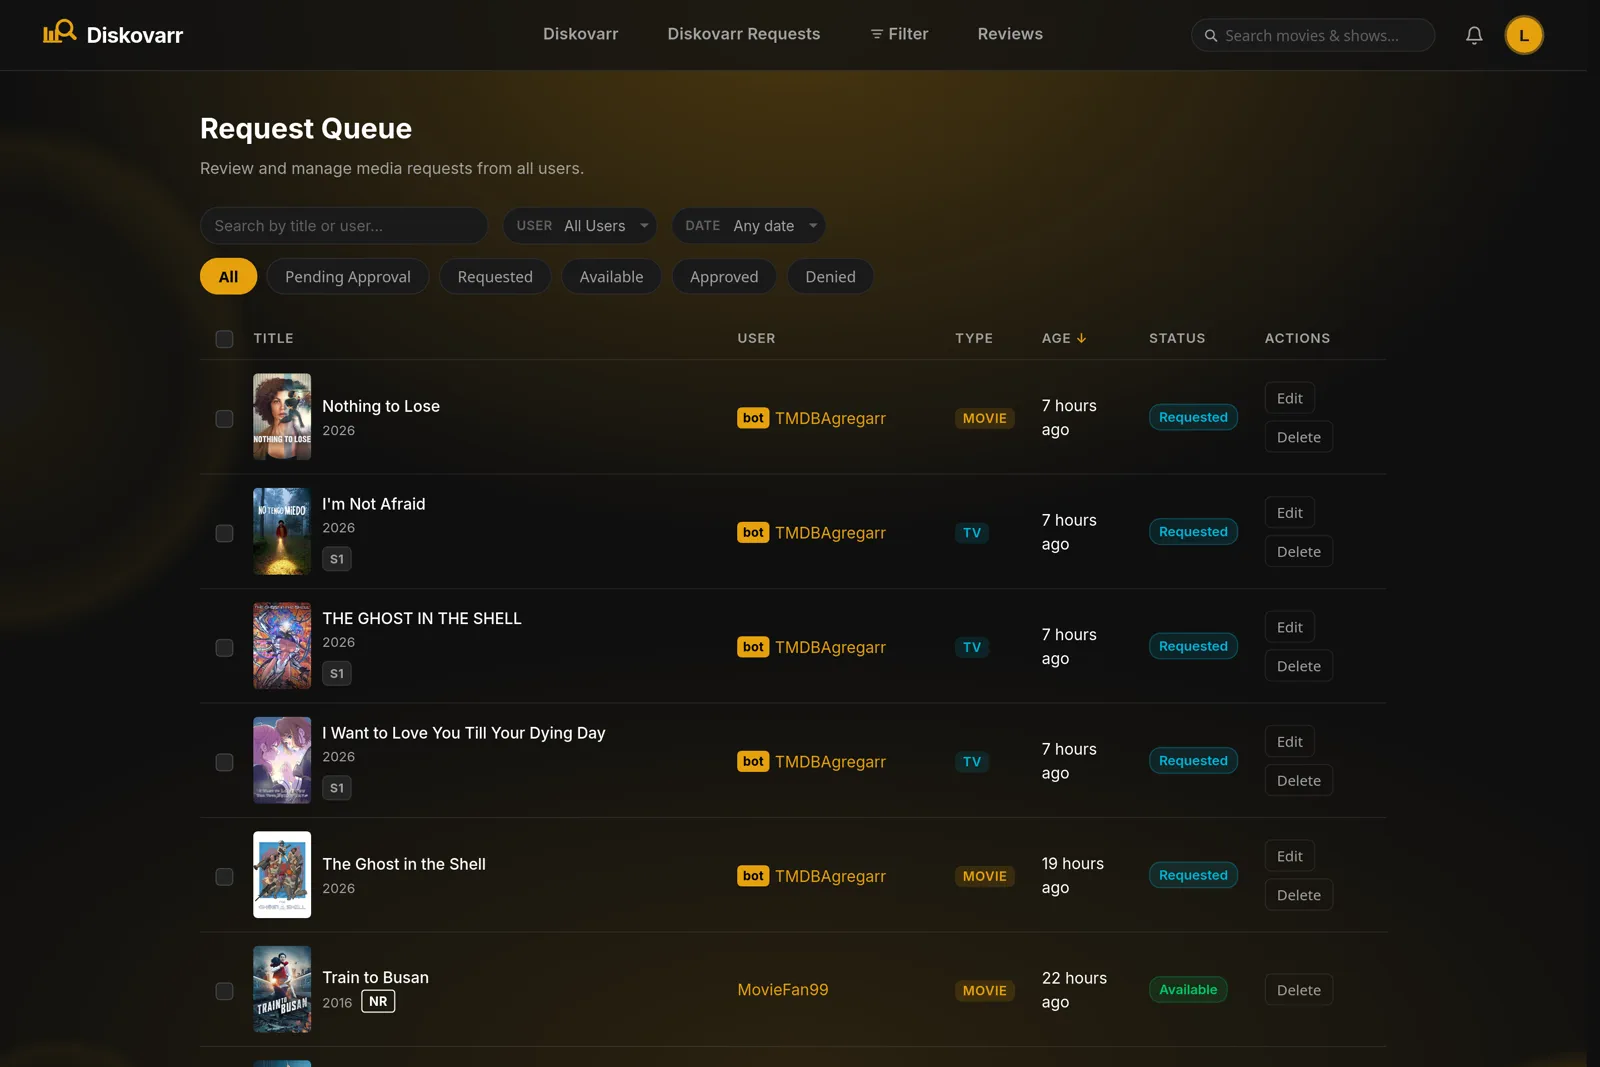
Page - Queue
The request queue shows all submitted requests. Regular users see their own requests ("My Requests"). Admins and elevated users see all requests ("Request Queue") with full approval controls.
Filter Tabs
All · Pending (with count) · Requested · Approved · Available · Denied. Click any tab to filter the table. The Available tab shows approved requests whose title has already arrived in the Plex library.
Search & Filters
Above the table is a filter row that narrows results server-side and combines with the active tab:
Search - type a title to filter the queue by name. Input is debounced and matched on the server, so it works across every page of results, not just the rows currently shown.
User (admin view) - a searchable dropdown of everyone who has submitted a request, to show one user's queue at a time.
Date range - limit the queue to requests submitted between two dates.
Active filters persist as you page through results. A Clear control resets search, user, and date range back to the full queue.
Bulk Selection (Admin / Elevated)
Admin view adds a checkbox column. Tick individual rows, or use the header checkbox to select or deselect every request on the page. When at least one row is selected, a bulk action bar appears showing the selected count with Clear and Delete selected actions. Bulk delete asks for confirmation, then removes all chosen requests in a single call.
Sortable Columns
Click any column header to sort the queue by that column. Click again to reverse direction. An arrow indicator (↑ or ↓) shows the active sort. Sortable columns: Title, User, Type, Age, Status. Sort state is server-side - applies across all pages of results.
Table Columns
Title - poster thumbnail (52 × 78 px), title, year, rating. If a request was denied, the denial note appears below in red.
User - requester's avatar and name (admin view only)
Type - Movie (gold) or TV (blue) badge
Age - relative time since request was submitted (e.g. "3 hours ago")
Status - Pending / Requested / Available / Denied badge
Actions - varies by status and role (see below)
For TV requests, season chips appear below the title: S1 S2 S3… For shows with more than 9 seasons selected, the list truncates to an ellipsis followed by the last 8.
Request Actions (Admin / Elevated)
Approve
Routes the request to the configured service immediately. Changes status to Requested. Only available on Pending requests.
Deny
Opens a small input for an optional denial note, then marks the request Denied and notifies the requester.
Edit
Opens the edit modal - change the routing service or modify season selection for TV shows. Only available on Pending requests.
Delete
Permanently removes the request. Shows a confirmation modal with a "Don't ask again" checkbox (backed by localStorage). Available on all statuses.
All actions update the row in place - no page scroll or reload.
Pagination
25 / 50 / 100 items per page. The per-page preference is saved to localStorage and restored on next visit. Previous/Next buttons plus page indicator.
Page - Issues
Users report playback problems with library content. Admins manage and resolve them.
Reporting an Issue
Any library item's detail modal has a Report Issue button. Clicking it opens the issue form:
Description - text area for the problem details
Scope (TV only) - Entire Series / Specific Season / Specific Episode
Season number (if Specific Season selected)
Season + Episode number (if Specific Episode selected)
User View ("My Issues")
Shows the user's own reports with scope label, status badge, and a Details button. Filter by All / Open / Resolved / Closed.
Admin View ("Issue Reports")
Shows all reports from all users. Additional columns: poster, reporter name. Additional actions: Resolve, Close, Delete.
Search & Filters
Both views provide the same status tabs (All / Open / Resolved / Closed) plus a server-side filter row:
Search - filter reports by item title across all pages of results.
User (admin view) - a searchable dropdown of everyone who has filed an issue, to focus on a single reporter.
Date range - limit reports to those filed between two dates.
Filters combine with the active status tab and persist across pages. A Clear control resets them.
Bulk Selection (Admin)
Admin view adds a checkbox column with a select-all header checkbox. Selecting one or more reports reveals a bulk action bar with the selected count, Clear, and Delete selected. Bulk delete confirms first, then removes all chosen reports at once.
Status Badges
Open (orange) - awaiting admin action
Resolved (green) - admin has addressed the issue
Closed (gray) - issue closed without resolution (e.g. user error, duplicate)
Details Modal
Shows full description, scope breakdown, reporter (admin view), status, and admin note. Contains a threaded comment section:
Both user and admin can leave comments
Admin comments send a notification to the reporter
User comments send a notification to all admins
Admin can delete any comment
Admin Actions
Resolve
Opens a note input (optional), then marks the issue Resolved and notifies the reporter. The note is shown in the details modal.
Close
Same flow as Resolve but sets status to Closed.
Delete
Permanently removes the issue. Uses the same custom confirmation modal as queue deletions.
All actions update the row in place.
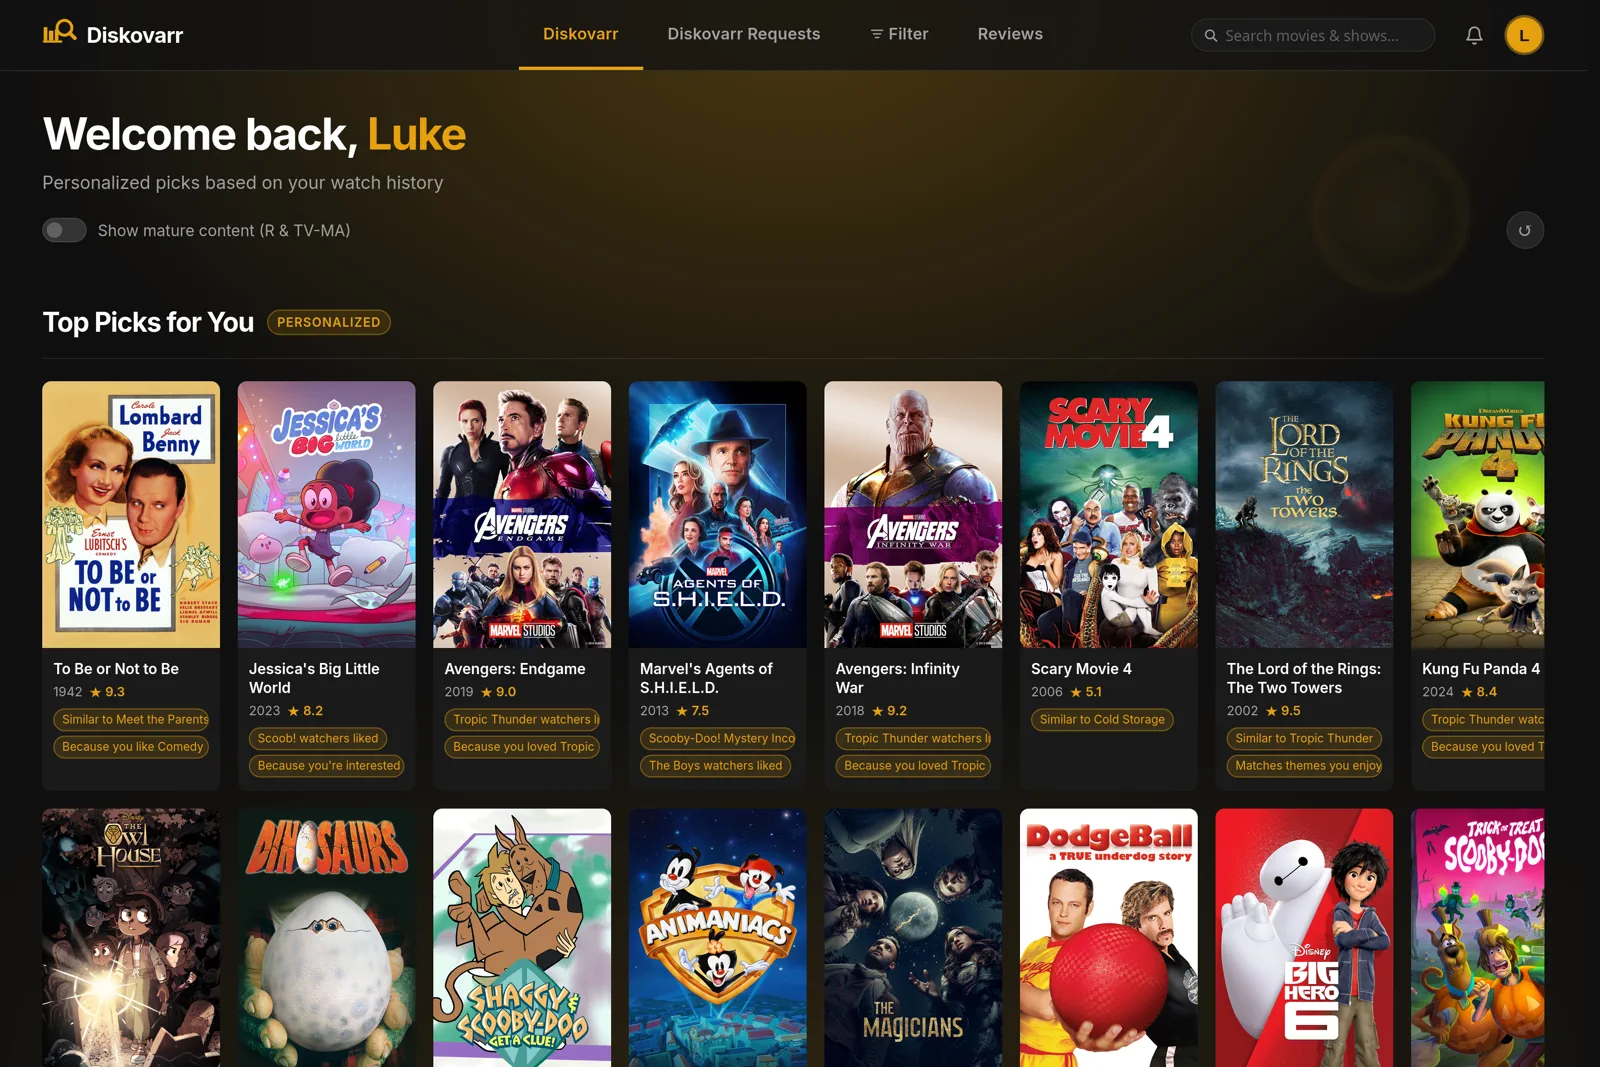
Page - Diskovarr Home
The home page shows personalized recommendations from your own Plex library for each user, based on their watch history.
Hero Controls
Show Mature Content Toggle
When off (default), titles rated R or TV-MA are hidden from all recommendation sections. Toggle state is stored per-user server-side.
Shuffle ↺
Refreshes all recommendation sections simultaneously by fetching a new randomized ordering from the current scored cache.
Recommendation Sections
Four carousels load in parallel after the page opens:
Top Picks for You - highest-scored items across all types, labeled "Personalized"
Movies - top-scored movies from your library's extended TMDB neighborhood
TV Shows - top-scored TV series
Anime - TV items tagged with the "Anime" genre
Sections show a shimmer skeleton while loading and are replaced with live cards on fetch.
In December, a Wrapped banner tile appears on the home page with "Wrapped {year}", "Your year in review is ready — take the tour", and an "Unwrap →" button. See Diskovarr Wrapped.
Most Popular on the Server
Below the personalized carousels, two server-wide rows show what everyone has been watching - Most Popular Movies on the Server and Most Popular TV Shows on the Server. Both carry a Last 90 Days badge.
Ranked by server-wide watch statistics from Tautulli over the last 90 days
Respect the Show Mature Content toggle - mature titles are hidden unless it's on
Only appear when there's data to show
Each card supports + Watchlist, opening the detail modal, and a "Not interested" dismissal, and marks titles you've already watched
Cards
Each card shows a poster with title, year, and rating below. On hover:
+ Watchlist - saves the item to the user's watchlist
✕ Dismiss - hides the item from all future recommendations for that user
Clicking the poster opens the detail modal
Detail Modal
Clicking a poster opens the item detail modal, with an Overview tab (backdrop, ratings, recommendation reason tags, synopsis, trailer, and actions like Play on Plex, Cast to TV, Watchlist, and Report Issue) and a Cast & Crew tab. See Item Detail Modal for the full breakdown.
Recommendation Engine
The engine builds a scored list of items from your library for each user by:
Fetching TMDB recommendations and similar titles for everything the user has watched
Scoring each candidate using: TMDB similarity (40pts), shared director (30pts), shared actor (35pts), keyword overlap (25pts), same collection (30pts), shared studio (10pts), genre match (8pts/genre), same decade (8pts), high rating bonus
Subtracting points for previously dismissed items
Filtering out items already in the user's library
Caches are pre-warmed every 25 minutes per user in the background so the page loads instantly.
Page - Diskovarr Requests
Shows personalized picks from TMDB that are not yet in your library. Users can request titles directly from this page. Requires TMDB API key to be configured in Admin → Connections → TMDB.
Hero Controls
Show Mature Content
Controls include_adult in TMDB discover API calls at the source. Stored server-side per user - the preference applies to which candidates are fetched, not just which are displayed. Default off.
Hide Requested
Filters out all already-requested items from every section server-side. When on, only truly unrequested recommendations are shown. Toggle state persists across sessions in localStorage.
Shuffle ↺
Refetches all sections with a new random ordering from the scored cache.
Sections
Top Picks for You - highest-scored non-library items, "Outside Your Library" badge
Movies - top-scored movie candidates
TV Shows - top-scored TV candidates
Anime - anime candidates (sourced from Japanese-language TMDB discover)
Trending Movies - TMDB weekly trending movies not in your library
Trending TV Shows - TMDB weekly trending TV not in your library
Browse by Genre - grid of 18 genre tiles with gradient backgrounds and emoji icons; clicking a genre navigates to Search filtered to that genre
Upcoming Movies - movies releasing in the future, "Coming Soon" badge; shown when 8+ items are available
Upcoming TV Shows - TV shows releasing in the future, "Coming Soon" badge; shown when 8+ items are available
Genre Browse
A genre browse section displays clickable genre cards (Action, Comedy, Drama, Horror, etc.) with gradient backgrounds and emoji icons. Clicking a genre card navigates to the Search page filtered to that genre, showing all TMDB results for that genre not in your library.
Coming Soon
Coming Soon sections show upcoming movies and TV shows with release dates in the future. Each card displays a "Coming Soon" badge (or "Requested" if already requested). These sections help users discover and request content before it's released.
Request Badges & Buttons
Requested badge
Shown on any card for an item that has been requested by any user. The item still appears so others know it's on its way.
Request button
Opens the request dialog. Lets the user select a service (if multiple are available) and optionally specific seasons (for TV).
Notify Me button
Shown instead of Request when the item was already requested by a different user. Clicking creates a follow entry - you'll receive a notification when the title becomes available in the library, without placing a duplicate request.
Requested ✓
Shown (disabled) when you are the requester or you've already clicked Notify Me.
TMDB Pipeline
Candidate discovery is optimized to minimize API calls:
A shared candidate pool is pre-fetched once per unique region+language+mature combination across all users (8-hour TTL)
Full item details (genres, cast, keywords, ratings, trailers) are cached in the database permanently once fetched
Per-user scoring runs every 28 minutes in the background against the shared candidates
Region and language preferences (set in My Settings) are applied to TMDB discover queries at fetch time
Page - Filter
Browse your own Plex library with a rich set of filters and sorts. Every item shown is already in your library. Filters update results in real time.
Common Filters
The most-used filters sit inline as chips at the top of the control bar:
Search
Debounced free-text title search.
Type
All / Movies / TV Shows / Anime.
Genre
Multi-select, loaded from your actual library content.
Minimum Score
Rating threshold from Any up through ★ 5+, 6+, 7+, 7.5+, 8+, 8.5+, 9+, 9.5+, to ★ 10.
More Filters
A More filters drill-down menu (with back navigation) holds the rest:
Decade
By release decade, 1920s through the present.
Year
A specific release year (commits on blur).
Content Rating
By certification (G, PG, PG-13, R, NC-17, TV-G, TV-PG, TV-14, TV-MA …), drawn from what's present in your library.
Release Date
A from/to date range (commits on blur).
Runtime
A min/max duration range in minutes (commits on blur).
Advanced Facets
People and catalog facets are also under More filters. High-cardinality facets (Director, Actor, Writer, Producer) are search-as-you-type; the rest load their full value list when opened:
16 sort options are available: Highest Rated (default), Critic Rating, Content Rating, Recently Added, Last Episode Added, Release Date (Newest), Release Date (Oldest), Newest First, Oldest First, Longest Duration, Shortest Duration, Unwatched First, Your Rating, Recently Viewed, Most Played, and A–Z.
Applied Filters & Results
Every active filter appears as a removable chip below the control bar, each with its own ✕, plus a Clear All button. Results load as a card grid with a Load More button. Clicking a card opens the item detail modal with Play on Plex and Cast to TV. Items you've already watched show a small green checkmark badge.
Page - Search
Search across both your Plex library and TMDB simultaneously. Supports text search, genre-based browsing, and advanced filtering.
Nav Bar Search
The search input is always visible in the navigation bar on desktop. On mobile it collapses to a magnifying glass icon - tapping it expands a full-width overlay input.
As you type, TMDB autocomplete suggestions appear in a dropdown showing title, year, and type (Movie/TV). Select a suggestion or press Enter to go to the full search results page.
Search Results Page (/search?q=…)
Results from your Plex library appear first with an "In Library" indicator
Library items you've already watched show a small green checkmark badge on the poster
TMDB results not in your library appear below with a Request or Coming Soon button
Library items open the full detail modal including Cast to TV and Report Issue
Non-library items open the request dialog
Load More button fetches additional TMDB results
Back button returns to the previous page or falls back to the configured landing page
Filter Section
When viewing search results or genre-browse results, a collapsible filter section lets you narrow down what's shown:
Hide in Library
Toggle to hide items already in your Plex library. Useful for finding only content you don't yet have. Defaults to on when browsing by genre.
Genre
Multi-select genre chips to filter results to specific genres. Chips are dynamically built from your library's genres.
Year Range
Set a minimum and/or maximum year to filter by release date.
Content Rating
Filter by TMDB content rating (e.g. PG-13, R, TV-MA).
Minimum Score
Set a minimum TMDB rating threshold to filter out low-rated results.
More Like This
When viewing search results or item details, a More Like This section shows similar titles based on TMDB recommendations and local metadata overlap. It scores candidates by shared directors, cast, genres, keywords, collections, and language - then re-ranks them so the most relevant results appear first. The Hide in Library toggle also applies to this section, so you can see only items you don't already have.
Item Detail Modal
Clicking any poster - on Home, Requests, Filter, Search, Watchlist, or Blacklist - opens the detail modal. It has two tabs: Overview and Cast & Crew.
Overview Tab
Backdrop hero image and poster thumbnail
Title, year, content rating, and audience/critic ratings
Recommendation reason tags (e.g. "Similar to Breaking Bad", "Director match")
Genre chips and synopsis
Embedded YouTube trailer when available
Action row: Play on Plex, Cast to TV (library items - see Cast to TV), + Watchlist / ★ In Watchlist, Monitor (quick-create a content monitor from this title), and Report Issue
Cast & Crew Tab
A visual, clickable browse of everyone involved in the title, sourced from TMDB. Loads on demand the first time you open the tab.
Cast
A horizontally-scrolling row of cast cards, each with the actor's photo, name, and the character they played. Scroll arrows appear when the row overflows.
Crew
Crew members ordered by importance - Director, Writing, Production, Music, Cinematography, Editing, Art Direction, then other roles. Labeled "Key Crew" for TV shows. Each card shows photo, name, and job.
Click-through
Clicking any person jumps to a "More with [name]" browse on the Search page to find their other titles.
People without a TMDB photo fall back to a silhouette placeholder. If no cast/crew data is available, the tab shows "No cast or crew information available."
Cast to TV
Cast to TV sends playback of any library item to a Plex player (smart TV, streaming stick, Roku, Apple TV, etc.) directly from the detail modal. As of v2.5.3, it works from anywhere — for the server admin at home and for remote users — because the playback command is delivered from your browser, which shares Wi-Fi with your TV, rather than from the server.
How It Works
When you click the cast button, Diskovarr performs three steps:
Prepare (server-side) — Diskovarr calls your Plex server to create a PlayQueue for the chosen title, then looks up your players via plex.tv/api/v2/resources using your own Plex account token. It returns the player's connection URIs and ready-made playMedia parameters.
Deliver (browser-side) — your browser sends the playMedia command directly to the player over your local network. This is what makes remote casting work: the server can never reach a TV inside another household's network, but your browser can because it's on the same Wi-Fi as your TV.
Stream — the player pulls the stream from the Plex server via its public *.plex.direct address (standard Plex remote access, not Plex Pass relay).
ℹ
Device discovery is entirely per-user. Diskovarr uses your own Plex token so each user only ever sees their own Plex player devices — not the server admin's or any other user's.
ℹ
If the browser cannot reach the player on the local network, Diskovarr automatically falls back to server-side delivery. This works when the player is on the server's LAN, which is why casting "just works" for the admin at home regardless of browser.
Browser Support
⚠
Chromium 142+ required for browser-delivered casting. Chrome, Edge, and Brave on desktop and Android are supported. On first cast, the browser shows a one-time Local Network Access permission prompt — you must click Allow. Firefox, Safari, and all iPhone/iPad browsers block browser-to-LAN requests. Remote users on these browsers cannot cast to their TV; they will see a clear error message instead. (On the server's own LAN, the server-side fallback works regardless of browser.)
Requirements
Chromium browser (remote users)Required for remote casting
Chrome, Edge, or Brave version 142 or later is required for the browser-delivered cast path. On first cast, allow the Local Network Access permission prompt. Firefox, Safari, and all iPhone/iPad browsers cannot send browser-to-LAN requests and cannot cast remotely.
Same Wi-Fi as the playerRequired
Your browser device must be on the same local network as the TV you are casting to. The browser sends the playback command directly to the player's LAN address.
Plex server remote accessRequired for remote streaming
The player streams content from the Plex server's public *.plex.direct address. Standard Plex Remote Access must be enabled and working on the server. This is the built-in Plex tunnel, not Plex Pass relay.
Full Plex accountRequired
Each user must be signed in with their own full Plex account (not a Plex Home managed user). The plex.tv/api/v2/resources endpoint is scoped to the authenticated account — managed user tokens return an empty or restricted device list, so the cast picker will appear empty.
Plex app open on the TVRequired at cast time
The Plex app on the target device must be running and in the foreground when you cast. The cast command is sent to the app's active session. If the app is closed or in the background, the command is delivered but may be ignored, resulting in nothing happening on the TV.
Device signed in to the same Plex accountRequired
The TV's Plex app must be signed in to the same Plex account that is logged in to Diskovarr. If your friend logs in to Diskovarr, the cast picker shows devices signed in to their Plex account — not yours. Each user casts only to their own devices.
Using the Cast Picker
Open any library item's detail modal (click a poster on the home page or filter page)
Click the Cast to TV button in the action row (button initially shows … while loading devices)
A dropdown expands showing all Plex player devices registered to your account, displayed as Name · Product. If the list is empty, see Troubleshooting below.
Click the device you want to cast to. The button shows "Casting…" while the command is sent.
Playback starts on your TV. A confirmation toast appears: "Playing on {name}".
Troubleshooting
Cast picker is empty — no devices listed
Plex app not registered to your account
Open the Plex app on your TV and make sure it is signed in to your Plex account. The picker shows "No Plex clients found." and "Open your Plex app on your TV first." when no devices are registered. Devices appear once they have been used with your account at least once.
Using a managed user account
Plex Home managed users (created under another person's account) do not have independent device registries on plex.tv. The resources API returns nothing for managed user tokens. To fix this, the server admin must add you as a Friend/Share using your own full Plex account email instead.
plex.tv API temporarily unreachable
Device discovery requires a live connection to plex.tv. If plex.tv is down or the server has no internet access, the list will be empty. Try again after a moment.
Devices appear but cast fails or nothing happens on the TV
Plex app is closed or backgrounded
The app must be open and active on the TV when the cast command arrives. You may see "Player not found. Make sure your Plex app is open on your TV." Open Plex on the TV first, then cast from Diskovarr.
Could not reach the device from this browser
Error: "Could not reach the device from this browser. Make sure you are on the same Wi-Fi network as your TV, and allow local network access if prompted (Chrome works best)." — Make sure your browser and TV are on the same Wi-Fi network. If you see a Local Network Access permission prompt, click Allow. Use Chrome (or another Chromium-based browser); Firefox and Safari on iOS/iPadOS cannot send local network requests. If you are on the server's own LAN, the server-side fallback should still work.
Device refused the playback command
Error: "The device refused the playback command. Try restarting the Plex app on it." — Restart the Plex app on your TV and try again.
Device doesn't accept remote playback commands
Error: "This device doesn't accept remote playback commands. Open the Plex app on it and try again." — Some older or non-standard Plex clients do not support remote play commands. Update the Plex app on the device if possible.
PlayQueue creation failed
If the Plex server is temporarily unreachable, the PlayQueue step is skipped and Diskovarr attempts to cast without one. Some Plex client apps require a PlayQueue to start playback — if yours does, the cast will fail silently. Check that your Plex server is online and reachable from Diskovarr.
Server error in the browser console
If the cast button shows an error toast, open your browser's developer tools (F12) → Console or Network tab, then try casting again. The error message from the server will indicate whether it is a "Player not found" (device lookup failed), "Timed out reaching the player…", "Could not connect to the player…", or a status code (e.g. 400/401 from the Plex player API).
Cast works for the server admin but not for friends
Most likely cause: friend's browser or permissions
The admin benefits from the server-side fallback (the server reaches the admin's TV on the local LAN). For remote users, casting relies on the browser path, which requires Chromium 142+ and an allowed Local Network Access permission. If the friend is using Firefox, Safari, or an iPhone/iPad browser, the browser path is unavailable. Also check that the friend allowed the Local Network Access prompt on first cast.
Friend is a managed user
See "Using a managed user account" above. The server admin should re-add the friend as a full Plex account share instead of a managed user.
ℹ
Known limitation: Cast to TV is only available on library items (items already in your Plex library). Items on the Diskovarr Requests / Explore page are not yet in the library and cannot be cast — the button does not appear for them.
Page - User Profile
Every user has a public profile with a bio, favorite genres and titles, and their full review history. Your own profile is also where your Watchlist and Blacklist now live.
What's on a Profile
Header
Avatar, username, review count, and a Follow / Following button when viewing someone else's profile.
Bio
A short user-written bio, up to 500 characters.
Favorite Genres
Up to 5 genres, shown as chips.
Favorite Media
Up to 5 favorite movies/shows displayed as a poster grid.
Reviews
A paginated, infinitely-scrolling feed of all the user's reviews.
Wrapped
On your own profile, a ✦ Wrapped button opens your Diskovarr Wrapped year-in-review. Available year-round.
Editing Your Profile
On your own profile, click Edit Profile to open the editor. You can change your bio (with a live character count), pick up to 5 favorite genres from a searchable dropdown, and add up to 5 favorite titles via search (each shown with a poster thumbnail). Save to apply - changes appear on your profile immediately. Only the profile owner can edit.
Watchlist & Blacklist Tabs
Your profile has three tabs: Profile, Watchlist, and Blacklist. The Watchlist and Blacklist tabs are visible only to you - other users viewing your profile see just the Profile tab.
ℹ
Watchlist and Blacklist moved out of the user menu and into the profile. See Watchlist and Blacklist for what each tab does.
Page - Reviews
A social, Letterboxd-style feed of community reviews. Users rate and review what they've watched, react to and comment on each other's reviews, follow reviewers, and share reviews publicly.
Writing a Review
Reviews are created from the Watch History page - you can only review something you've actually watched in Plex. Click Write Review (or Edit on an existing one) next to any watched item to open the review modal.
Star Rating
A 5-star scale with half-star precision (click the left half of a star for X.5, the right half for the whole star). Clicking the current value again clears it. Your rating is required to save. See Ratings & Sync for how ratings flow back to Plex and TMDB.
Review Text
Optional free-text, up to 2,000 characters, with a live character count.
Contains spoilers
Marks the review as a spoiler. Spoiler text is blurred/hidden in the feed and revealed only when a reader chooses to.
Would rewatch
A flag indicating you'd watch it again, shown as a badge on the posted review.
After posting, a success panel offers to Share Review, Copy Link, or Download Share Image. You can delete your own review from the same modal.
The Reviews Feed
The Reviews page is an infinitely-scrolling feed of reviews from everyone on your server. Each post shows the reviewer's avatar and name, a timestamp, the media poster/title/year, the star rating, and the review text.
Likes
Tap the heart to react to a review. The button toggles state and shows the total like count.
Comments
Open the comment thread to discuss a review. Comments support nested replies, and the comment author can edit or delete their own comments.
Follow
A Follow / Following button appears on reviews from other users. Following reviewers shapes a more personalized feed and is reflected on user profiles.
Spoilers
Reviews flagged as spoilers are hidden behind a Reveal spoiler control so the feed stays safe to scroll.
Sharing Reviews
Every review can be shared from the Share button (on a posted review or in the feed), which opens a share sheet. Each review has a public link (/review/:id) that opens without logging in, and an auto-generated share image rendered server-side - a landscape card (/og/review/:id.png) for link previews and downloads, plus a square card (/og/review/:id/square.png) for Instagram and mobile share sheets.
The Share Sheet
Add a comment
An optional note (up to 280 chars) prepended to the outgoing share text. It only affects the share - your original review is never changed.
Primary actions
Share (the device's native share sheet, where supported), Copy link, Copy text, and Image (download the share card).
Share to a social app
One-tap targets for Facebook, X, Threads, Reddit, Bluesky, Mastodon, LinkedIn, Telegram, WhatsApp, Discord, and Email. Mastodon prompts for your home instance; Discord copies a ready-to-paste message.
Instagram
Instagram has no web post URL, so it uses the native share sheet with the square image attached (falling back to downloading the image so you can post it manually).
ℹ
The social-app buttons require Diskovarr to be reachable at a public URL (set the App Public URL in Admin → General) so the link and its preview image resolve for everyone. When no public URL is set, Copy Link, Copy Text, Download Image, and Instagram still work.
ℹ
Items watched in Plex are matched to TMDB where possible. Library items without a TMDB match are still reviewable - they're keyed by their Plex ratingKey instead.
Page - Watch History
A chronological table of everything you've watched in Plex - movies, episodes, and viewing sessions - with completion progress and a one-click path to writing a review.
The History Table
Title
Poster thumbnail, title, and (for episodes) the parent show name with S##E## numbering and video resolution where available.
UserAdmin only
Avatar and username of who watched it. Admins can filter the table by specific users.
Type
A Movie or TV badge.
Date Watched
The watch date, with the exact time on hover.
Progress
A completion bar (0–100%) with time watched, color-coded green for complete and cyan for partial.
Review
Write Review for items you haven't reviewed, or ⭐ Edit (showing your rating) for ones you have. Opens the review modal.
TV Episode Grouping
Episodes of the same series watched in one session collapse into a single parent row showing the series title, an episode-count badge, an "X/Y watched" progress summary, and total time spent. Expand it to see and individually review each episode.
Filters, Sorting & Pagination
Search
Debounced title search.
Media Type
All / Movies / TV Shows.
Watched Status
All / Complete / Incomplete / Reviewed.
Date Range
From/to pickers to scope history by when items were watched.
UsersAdmin only
Multi-select to view specific users' history.
Sort & Per-Page
Sort by Date, Title, or Duration (ascending/descending). Page size of 25, 50, or 100 is remembered between visits.
ℹ
Watch history is sourced from Tautulli. Reviews can only be written for items that appear here, since a review must be tied to something the user actually watched. This watch history also powers Diskovarr Wrapped.
Diskovarr Wrapped
A personal, Spotify-Wrapped-style year-in-review for every user. One stat per slide, told in story style, with each slide individually shareable as a card image. Available year-round from your profile and pushed to the home page every December.
Accessing Wrapped
✦ Wrapped button on your own profile page — available year-round
December banner tile on the home page — "Wrapped {year}" / "Your year in review is ready — take the tour" / "Unwrap →"
Direct URL — /wrapped (latest year) or /wrapped/2025 (specific year)
Year-picker pills for browsing past years' Wrapped archives
ℹ
Each year's Wrapped unlocks on December 1 of that year and stays viewable forever as an archive. Admins can preview the locked in-progress year with a "Preview" badge. Non-admins see: "This Wrapped unlocks December 1 — hang tight!"
The Story
Wrapped presents your year as a slide-by-slide story. Use keyboard arrows, click, or swipe to navigate. Slides with no data are skipped automatically:
Your year in numbers — total hours watched
Your top movie — most-watched film of the year
Your top show — most-watched series
Blast from the past — the oldest title you watched
Your genres — genre breakdown of your viewing
When you watched — month-by-month chart, peak weekday, and peak hour
Binges & streaks — longest viewing sessions and consecutive-day streaks
Where you rank — your Top X% percentile among server users
Your taste age — average release year of what you watched
Show buddy — the show you watched most with others on the server
Your Diskovarr personality — one of 12 archetypes (Adventurer, Voyager, Thrill Seeker, Detective, Comedian, Romantic, Scholar, Dreamer, Daredevil, Maestro, Insider, Omnivore) with trait chips (Night Owl, Early Bird, Marathoner, Binger, Completionist, Movie Buff, Series Devotee, Time Traveler)
The critic — your reviews for the year (shown only if you wrote any)
Your year on Diskovarr — reviews written, requests made, reactions given
Server leaderboard — everyone's hours and plays, shown with real usernames
That's a wrap — finale slide with a playlist button and "See you next December!"
Sharing
Every slide has a Share button. Clicking it generates a server-rendered share-card image (wide Open Graph variant and square variant) that you can post to any platform: Facebook, X, Threads, Reddit, Bluesky, Mastodon, LinkedIn, Telegram, WhatsApp, Discord (copy link), Email, native share, or download.
The share text reads: "My {year} Diskovarr Wrapped — {statLine}".
ℹ
Privacy: Share cards are public images but live behind an unguessable 64-bit per-user slug. Nothing is shared until you share it. If you recompute your Wrapped, the slug is regenerated and all old links are revoked.
Wrapped Playlist
One click on the finale slide builds (or rebuilds) a "Diskovarr Wrapped {year}" playlist in your own Plex account, containing your top 10 movies and top 5 shows from the year.
Privacy & Visibility
Each user sees only their own Wrapped data. The server leaderboard slide shows everyone's hours and plays by real username — this is the only cross-user visibility in Wrapped.
Data & Accuracy
💡
Wrapped is built from Tautulli-synced watch history. A play counts only if Tautulli marked it as watched, or if it ran for at least 5 minutes and reached at least 20% completion (this filters out accidental plays). Titles that were deleted and re-added to your library are re-matched by title and year so watch time merges correctly across rating-key changes.
Admin Tools
Admins have two controls on the Wrapped page:
Recompute this year — recalculates all users' Wrapped data for the selected year from current watch history
Backfill full Tautulli history — pages through all of Tautulli's historical watch data. Recommended to run once on installs that are newer than the year being wrapped, so Wrapped has complete data
My Settings
Each user's personal preferences: region and language for TMDB discovery, landing page, and notification preferences. Accessible from the user menu (avatar button).
Content Preferences
Region
30+ country options. Applied to TMDB discover queries in the Diskovarr Requests tab - affects which trending titles and genre results are shown. Does not affect library recommendations.
Language
15+ language options. Applied alongside region to TMDB discover queries.
Default Landing Page
Toggle between Diskovarr (home, library recommendations) and Diskovarr Requests (explore, TMDB discovery). Controls where you land after login and when clicking the Diskovarr logo. Admins can also set this per-user in the per-user settings page.
Connected Accounts
Connect external accounts to sync your ratings outward. Today this is TMDB (The Movie Database). Only your star rating is sent when you push a review - review text and watch dates stay local. See Ratings & Sync for how this fits with the automatic Plex rating sync.
Connect
Opens a TMDB OAuth popup. Approve access in the popup and the connection completes automatically. If popups are blocked, the auth URL is shown so you can open it manually.
Status
Shows Active when connected (with your TMDB account ID, connection date, and last-verified time), or Needs Reconnect if the session expired or was revoked.
Verify
Checks that the TMDB session is still valid and refreshes the last-verified timestamp.
Disconnect
Removes the connection (with a confirmation step). Ratings already pushed to TMDB are unaffected.
Once connected, a Push rating to TMDB checkbox appears in the review modal. See Reviews.
Notification Preferences
Checkboxes for each notification type. Standard users see: Request Approved, Declined, Available, Issue Resolved, Issue Comment, Auto-Requested from Watchlist, and Monitor match (see Content Monitors). Elevated users also see: New Request Pending, Auto-Approved, Processing Failed, New Issue Reported.
Monitors
The Monitors tab is where you create and manage content monitors - saved sets of criteria (genre, cast, director, studio, and more) that notify you when matching content is added to Plex or becomes available to request.
Discord
Discord User ID
Your Discord user ID (numeric, e.g. 123456789012345678). Required to receive bot DMs. Enable developer mode in Discord settings to see user IDs.
Join Server
Shown if the admin configured a Discord invite link. Opens the invite in a new tab so you can join the server (required to receive DMs from the bot).
Test
Sends a test DM to your Discord account to verify the connection.
Enable Discord Notifications
Master toggle for Discord DMs. Disabling this stops all Discord notifications for you regardless of type checkboxes.
Pushover
User Key
Your personal Pushover user key (30 characters, from the Pushover app or pushover.net dashboard).
Test
Sends a test notification to your Pushover devices.
Enable Pushover Notifications
Master toggle for Pushover. Disabling stops all Pushover notifications for you.
Telegram
Chat ID
Your personal Telegram chat ID for receiving DMs from the bot. Get it by messaging the Diskovarr bot then visiting https://api.telegram.org/bot<BOT_TOKEN>/getUpdates.
Message Thread ID
Optional. For forum supergroups: the thread ID where messages should be posted.
Sends a test notification to your Pushbullet devices.
Enable Pushbullet Notifications
Master toggle for Pushbullet notifications.
Email
Email Address
Your email address to receive notifications. Requires SMTP to be configured in Admin → Notifications → Email.
Test
Sends a test email to verify delivery.
Enable Email Notifications
Master toggle for email. Disabling stops all email notifications for you regardless of type checkboxes.
WebPush
Subscribe
Click to subscribe your browser to push notifications. You'll be prompted to allow notifications. Works even when the browser tab is closed. Requires Diskovarr to be served over HTTPS.
Unsubscribe
Removes your browser's push subscription. You won't receive WebPush notifications until you subscribe again.
Enable WebPush Notifications
Master toggle. Disabling stops WebPush notifications even if you're subscribed.
Content Monitors
Monitors let each user describe the content they care about and get notified the moment a match becomes available - either newly added to Plex or newly requestable. Set them up under My Settings → Monitors, or create one in a click from any title's detail modal.
Creating a Monitor
From the Monitors tab, click + Create Monitor to open the editor:
Monitor NameRequired
A label for the monitor, e.g. "Horror Movies With Favorite Actors".
Status
Enable/disable toggle. A disabled monitor stays saved but sends no notifications.
Notification Types
Choose when to be notified: Notify when added to Plex (a match appears in the library) and/or Notify when available to request (a match surfaces as requestable content). Either or both.
Match Mode
Match ALL criteria (a title must satisfy every criterion) or Match ANY criteria (any single criterion is enough).
CriteriaAt least one
One or more rules that define a match. Add as many as you like with + Add Criterion.
Criteria Types
Each criterion is a type plus a value. Most values offer search-as-you-type suggestions; Media Type is a simple dropdown.
Media Type - Movie or TV Series
Genre
Cast Member, Director, Writer, Producer
Studio, Network, Production Company
Collection, Keyword
Country, Language
Values are matched case-insensitively. For example, a monitor with Genre: Horror + Cast Member: Toni Collette in Match ALL mode notifies you only about horror titles featuring that actor.
Quick Monitors from a Title
Every item detail modal has a Monitor button. It opens a dropdown of one-click monitors built from that title - monitor the exact movie/series, or everything matching its genre, studio/network, collection, director, or a cast member. Single-criterion picks are created instantly; you can also open the full editor pre-filled to refine them.
How Notifications Work
Diskovarr evaluates monitors automatically as content moves through the system:
Added to Plex - when library sync or the real-time Plex connection picks up a new item, it's checked against monitors with "Notify when added to Plex" enabled.
Available to request - when requestable content surfaces through TMDB-powered discovery, it's checked against monitors with "Notify when available to request" enabled.
A match raises a Monitor match notification (e.g. "Hereditary" matches "Horror With Favorite Actors") that explains which criteria matched. It's delivered to your in-app bell and any channels you've enabled, and respects the Monitor match toggle in notification preferences. Multiple matches at once are bundled to avoid spam.
Managing Monitors
The Monitors list shows each monitor with its match mode, a criteria preview, and a created date. Use the inline toggle to enable/disable, Edit to change it, or Delete to remove it.
ℹ
Monitors are per-user and private - each person manages their own and is only notified about their own monitors.
Page - Watchlist
A personal save list. Add items from any card or detail modal; review and remove them from your profile.
ℹ
The Watchlist moved from the user menu to the Watchlist tab on your profile. It's visible only to you.
Adding Items
The + Watchlist button appears on card hover overlays and in detail modals across all pages (home, explore, filter, search). Once added, the button changes to ★ In Watchlist.
Watchlist Page
Shows a grid of saved items with poster, title, year, and rating. Clicking a poster opens the same detail modal. The ✕ Remove button on each card removes it with a fade animation.
Auto-Request from Watchlist
If enabled in Admin → Users → Auto-Request Watchlist, adding an item to the watchlist automatically submits a request for it. This works per-media-type (movies and TV can be configured separately). Per-user overrides are available in the per-user settings page.
Page - Blacklist
A single place to review and manage every item you have marked "Not Interested". Whenever you dismiss a recommendation, it lands here so you can see what is hidden and restore anything you dismissed by mistake.
ℹ
The Blacklist moved from the user menu to the Blacklist tab on your profile. It's visible only to you.
What Appears Here
The blacklist is a unified view of all your dismissals, gathered from two places:
Library - items hidden from Diskovarr Home recommendations (dismissed from a card or detail modal on the Home page).
Diskovarr Requests - non-library TMDB suggestions dismissed from the Requests page.
Each card carries a small source badge so you can tell which list an item came from. Dismissed items are enriched with poster, title, and year (library items from the Plex library, Requests items from TMDB).
Managing Items
Click any poster to open the standard detail modal. Each card has a ✕ Remove button that lifts the dismissal: library items return to your Home recommendations, and Requests items become eligible to surface again on the Requests page. Removing an item refreshes its recommendation cache so the change takes effect on your next visit to that page.
ℹ
The blacklist is per-user. You only ever see the items you personally dismissed, never another user's hidden items.
Integration - Plex Real-Time Sync
Diskovarr keeps a persistent Server-Sent Events (SSE) stream open to your Plex server, the same notification endpoint Tautulli uses, to detect newly added library content in real time. No Plex Pass required. No setup needed.
How It Works
On startup, Diskovarr connects to the SSE stream at /:/eventsource/notifications on your Plex server. Plex pushes timeline events over this connection whenever items are added or updated. Diskovarr only acts on fully analyzed items (timeline state 5) so a title is not announced before Plex has finished processing it. When it sees a new library item, it:
Invalidates the library cache
Checks all pending requests against the new content
Sends "Request Available" notifications to requesters whose titles just arrived
This happens within seconds of Plex finishing the scan, with no polling interval and no Plex Pass subscription needed.
Verifying It's Connected
Check your Diskovarr service logs for:
[plex sse] Connected to Plex notification stream
If the stream drops (e.g. Plex restarts), Diskovarr automatically reconnects.
💡
The SSE connection is fully automatic once your Plex URL and token are configured in Admin → General. There is nothing to set up in Plex itself.
Integration - Agregarr Setup
Connect Agregarr to Diskovarr so collection-based auto-requests route through Diskovarr's queue instead of directly to Overseerr.
Step 1 - Get the Overseerr Compat Key
In Admin → General → Overseerr Compat API, enable the toggle and copy the Compat Key using the copy icon.
Step 2 - Configure Agregarr
In the Agregarr web UI, add an Overseerr source:
Overseerr URL - your Diskovarr URL (e.g. https://diskovarr.example.com)
API Key - the Compat Key from Step 1
ℹ
The Overseerr Compat Key already has admin-level permissions, so Agregarr can create its service user accounts automatically - no extra configuration needed.
What Happens
When Agregarr syncs a collection:
Agregarr sends requests to Diskovarr's /api/v1/ shim (Overseerr-compatible)
Diskovarr creates service user accounts per collection type (e.g. "TmdbAgregarr")
Requests appear in the Diskovarr queue with a bot badge
If auto-approve is enabled, they route to your configured service immediately
If rate limits are hit, Diskovarr returns a silent 201 so Agregarr's sync continues uninterrupted
After Updating the Key
If you regenerate the Overseerr Compat Key (Admin → General), update it in Agregarr's source configuration and restart the Agregarr container. Note this also invalidates the key for any other connected apps (DUMB, Homarr) - update those too.
Ratings & Sync
When a user rates something in a review, Diskovarr can push that star rating outward to Plex and TMDB. Two separate integrations handle this - one automatic, one opt-in.
Plex Rating Sync
Automatic. Saving a review with a star rating writes that rating to Plex for the same item, attributed to the reviewing user via their own Plex token. The half-star scale (0.5–5) is converted to Plex's 0–10 scale. Deleting a review clears the rating in Plex. No setup is required - it happens server-side as part of saving the review.
Attribution
The rating uses the user's stored Plex token where available so it shows up under that user's account in Plex, not the admin's.
Best-effort
If Plex is unreachable, the review still saves; the rating push is retried on the next save and never blocks the review.
Feeds recommendations
Plex star ratings are read back into the recommendation engine as a per-user preference signal.
TMDB Rating Sync
Opt-in. Users first connect their TMDB account under My Settings → Connected Accounts. Once connected, the review modal shows a Push rating to TMDB checkbox. Only the star rating is sent - review text and watch dates stay local to Diskovarr.
Per-review opt-in
The checkbox appears only when TMDB is connected and the item has a TMDB match. Tick it to push; leave it unchecked to keep the rating local.
Update & locked states
After a rating is pushed it shows as "Rating pushed to TMDB" (locked); changing your stars later offers "Update TMDB rating".
Graceful failures
If the TMDB session has expired (401) or you're rate-limited (429), the review still saves locally and a toast explains what happened.
ℹ
Plex sync is unconditional and needs no per-user setup; TMDB sync is always an explicit, per-review choice that requires connecting an account first. See Connected Accounts to connect TMDB.
API Reference
All public API endpoints. Authenticate with a session cookie (browser) or the X-Api-Key: your-key header (external tools). Generate your API key in Admin → General.
Authentication
Method
Path
Description
Key Params
GET
/auth/check-auth
Check if the current session is authenticated
None
GET
/auth/logout
End the current session
None
POST
/auth/callback
OAuth callback handler (Plex login)
OAuth params
GET
/auth/check-pin
Check Plex OAuth PIN status
None
Recommendations & Discovery
Method
Path
Description
Key Params
GET
/api/recommendations
Personalized library recommendations for the current user
mature
GET
/api/explore/recommendations
Diskovarr Requests picks (non-library TMDB items)
mature, hideRequested
GET
/api/explore/services
List enabled request services
None
POST
/api/explore/dismiss
Dismiss a recommendation from all future Requests results
tmdbId, mediaType
POST
/api/explore/follow
Follow a requested item to receive an availability notification
tmdbId, mediaType, title
GET
/api/popular
Most-watched movies and TV shows across the whole server (last 90 days, from Tautulli)
None
Library & Search
Method
Path
Description
Key Params
GET
/api/search
Search across Plex library and TMDB
q, genre, type, page
GET
/api/search/suggest
TMDB title autocomplete suggestions
q
GET
/api/search/details
Full TMDB item details
tmdbId, type
GET
/api/search/seasons
Get season numbers for a TV show
tmdbId
GET
/api/search/similar
"More Like This" - similar items based on TMDB recommendations + local metadata
tmdbId, type, hideLibrary
GET
/api/discover
Browse library with filters
type, genres, decade, minRating, sort, page, q
GET
/api/discover/genres
All unique genres in the Plex library
None
GET
/api/poster
Proxy Plex poster image (Plex token never exposed to client)
path
GET
/api/trailer
Fetch YouTube trailer key from TMDB
tmdbId, mediaType
Watchlist
Method
Path
Description
Key Params
GET
/api/watchlist
Get current user's watchlist items
None
POST
/api/watchlist/add
Add item to watchlist
ratingKey
POST
/api/watchlist/remove
Remove item from watchlist
ratingKey
Blacklist
Method
Path
Description
Key Params
GET
/api/blacklist
Get the current user's "Not Interested" items (library + Requests dismissals) enriched with metadata
None
DELETE
/api/blacklist/library/:ratingKey
Lift a library dismissal and restore the item to Home recommendations
None
DELETE
/api/blacklist/explore/:tmdbId/:mediaType
Lift a Diskovarr Requests dismissal so the item can surface again
None
Requests
Method
Path
Description
Key Params
POST
/api/request
Submit a new media request
tmdbId, mediaType, seasonList (TV), service
GET
/api/queue
Get request queue (admin: all; user: own) with server-side search, filter, and sort
status, search, userId, from, to, sort, sortDir, page, limit
GET
/api/queue/users
Distinct users who have made requests, for the admin filter dropdown (admin)
None
GET
/api/queue/:id
Get a single request by ID
None
POST
/api/queue/:id/approve
Approve a pending request (admin)
service
POST
/api/queue/:id/deny
Deny a pending request with optional note (admin)
note
PUT
/api/queue/:id
Update a request (edit service, seasons)
Request fields
DELETE
/api/queue/:id
Delete a request
None
POST
/api/queue/bulk-delete
Delete multiple requests in one call (admin)
ids[]
Issues
Method
Path
Description
Key Params
POST
/api/issues
Report a new playback issue
ratingKey, description, scope, season, episode
GET
/api/issues
Get issues (admin: all; user: own) with server-side search and filter
status, search, userId, from, to, page, limit
GET
/api/issues/users
Distinct users who have reported issues, for the admin filter dropdown (admin)
None
GET
/api/issues/:id
Get a single issue by ID
None
POST
/api/issues/:id/resolve
Resolve an issue with optional admin note (admin)
note
POST
/api/issues/:id/close
Close an issue with optional note (admin)
note
DELETE
/api/issues/:id
Delete an issue (admin)
None
POST
/api/issues/bulk-delete
Delete multiple issues in one call (admin)
ids[]
GET
/api/issues/:id/comments
Get comments on an issue
None
POST
/api/issues/:id/comments
Add a comment to an issue
content
DELETE
/api/issues/:id/comments/:commentId
Delete a comment (admin)
None
Notifications & Settings
Method
Path
Description
Key Params
GET
/api/notifications
Get user notifications (pass countOnly=1 for unread count)
countOnly
POST
/api/notifications/read
Mark specific notifications as read
ids[]
POST
/api/notifications/read-all
Mark all notifications as read
None
GET
/api/user/settings
Get user content preferences and notification settings
None
POST
/api/user/settings
Save user content preferences and notification settings
Get a user's profile (bio, favorite genres/media, counts)
None
PUT
/api/users/profile
Update your own profile
bio, favoriteGenres, favoriteMedia
GET
/api/users/:userId/reviews
A user's reviews (paginated)
page, limit
POST
/api/users/:userId/follow
Follow a user
None
DELETE
/api/users/:userId/follow
Unfollow a user
None
GET
/api/users/:userId/following
Who a user follows
None
GET
/api/users/:userId/followers
A user's followers
None
GET
/api/users/:userId/following-list
Detailed list of accounts a user follows
None
GET
/api/users/follow-stats
Follower/following counts for the current user
None
POST
/api/users/init-follows
Seed initial follow suggestions for the current user
None
Connected Accounts (TMDB)
Method
Path
Description
Key Params
GET
/api/tmdb/connection
Current TMDB connection status for the user
None
POST
/api/tmdb/connect/initiate
Start TMDB OAuth; returns the auth URL
None
GET
/api/tmdb/connect/callback
OAuth callback that finalizes the connection
OAuth params
POST
/api/tmdb/verify
Verify the TMDB session is still valid
None
POST
/api/tmdb/disconnect
Disconnect the TMDB account
None
POST
/api/tmdb/sync-rating
Push a review's star rating to TMDB
reviewId
DELETE
/api/tmdb/sync-rating
Remove a rating previously pushed to TMDB
reviewId
Admin - Library Sync
Admin-only endpoints (require an authenticated admin session) for choosing and syncing Plex libraries. See Admin → General.
Method
Path
Description
Key Params
GET
/api/admin/sync/libraries
Discover Plex movie/TV libraries with enabled state and item counts
None
POST
/api/admin/sync/libraries
Save which libraries are synced (disabling one deletes its synced data)
sections[]
POST
/api/admin/sync/library
Trigger an immediate full library sync
None
POST
/api/admin/sync/auto/enable
Enable the 2-hour auto-sync
None
POST
/api/admin/sync/auto/disable
Disable auto-sync
None
POST
/api/admin/sync/watched/:userId
Re-sync a user's Plex watched state and ratings
None
Wrapped
Method
Path
Description
Key Params
GET
/api/wrapped/:year
Your Wrapped payload for the given year (per-user; leaderboard included)
None
GET
/og/wrapped/:slug/:category.png
Public share-card image (wide, Open Graph) — slug-gated, unguessable per-user link
None
GET
/og/wrapped/:slug/:category/square.png
Public share-card image (square) — slug-gated, unguessable per-user link
None
Overseerr Compatibility Shim
The /api/v1/ endpoint exposes an Overseerr-compatible API for external tools (Agregarr, DUMB/Riven, Homarr). Authenticate with the Overseerr Compat Key from Admin → General using the header: X-Api-Key: your-compat-key. The shim maps Diskovarr's data model to Overseerr API format automatically.
Method
Path
Description
Key Params
PUT
/api/v1/media/:id/available
Mark a request's media as available. DUMB/Riven calls this after downloading content; Diskovarr enqueues a request_available notification to the requester (in-app bell plus any configured channels).